Don’t Vent Your Bathroom Fan to The Attic Space

Building codes across the country require bathroom venting. Sure, a bathroom fan helps if your notoriously fragrant Uncle Larry has just been in there, resulting in some major aromatic issues at the holidays, but the primary purpose of a bathroom fan is to remove moisture from the room.

Back in the day

Older homes were typically constructed with just one window in the bathroom. That was usually fine because those houses were generally not built as tight and normally contained only a bathtub, sink, and toilet. Over time, people renovated and added a shower to the bathroom. As the shower brought convenience, “bath day” turned into a daily shower ritual as the family grew. Showers create a lot of humidity, and if everyone in the family took a shower every day, the bathroom would become overly damp and steamy. The solution was to install a bathroom fan to exhaust the excessive moisture, and a lot of times, that bathroom fan was vented directly into the attic by the DIY homeowner.

Why it’s bad to vent to the attic

For years, homeowners and contractors alike vented the bathroom fan directly into the attic space. Over time, the high levels of humidity vented to the attic started to cause problems. The excessive moisture wasn’t finding its way up and out through the roof venting. Instead, it was condensing on the roofing structure and sheathing. That moisture, over time, resulted in the perfect environment for mold and mildew, and in some cases, dry rot of the roofing structure and sheathing. In the 1990’s, codes changed, and the bathroom fan was required to vent to the exterior of the home. Bathroom venting requirements have continued to change over time.

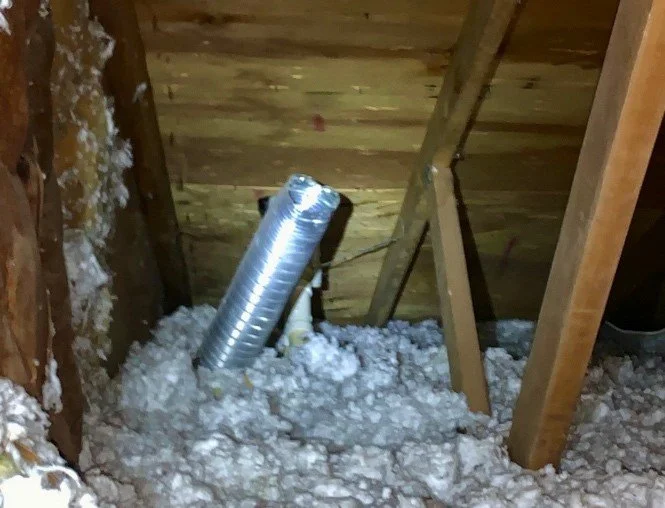
 The photo below shows an exhaust vent that has disconnected from the roof vent and is venting into the attic space near the soffit. Note the staining and deterioration on the sheathing, as well as the rust on the nails.

During the course of a home inspection, if the attic space is accessible, our home inspectors check to see that any bathroom fans or kitchen exhaust are not venting into the attic space. If we find any issues, they are documented as in need of correction in our inspection report.

 Attic design and purpose

Attics are designed to allow excess heat to escape from the attic. Typically, there are vents at the soffits for air to enter as well as vents near the peak for exhausting air. These can be roof vents, ridge vents, turbines, or thermostatically controlled power vents. So, if everything is working like it is supposed to, air will enter from the lower soffit area and move up and out of the vents at the peak. 

 Insulation Added in Attic Space

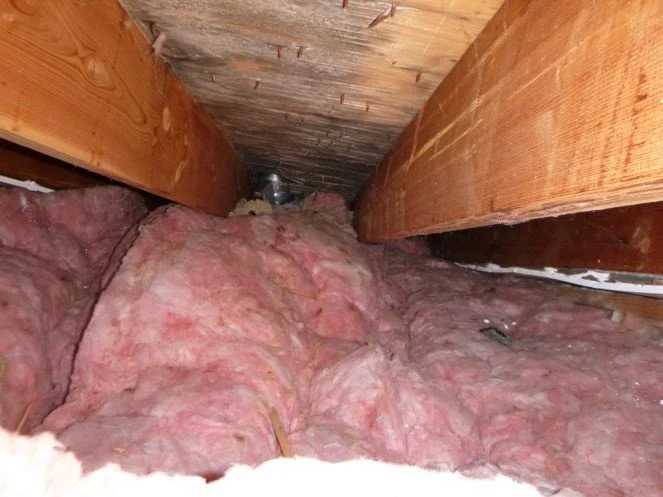
Occasionally, homeowners will add insulation to the attic space to increase energy efficiency. It is common in older homes that our home inspectors find that the soffit vents have been covered with insulation. This restricts the flow of air through the attic. We often see signs of poor ventilation as staining or deterioration on the roof sheathing, as well as rusted nails. Air can still move through the attic space, but not enough to remove excess moisture.

 Conclusion

Venting your bathroom fan to the attic space is not a good idea, but it is okay to vent through the attic by using the proper venting materials from your bathroom fan to a proper roof vent. In the end, if done properly, you can reduce the moisture problems in the bathroom and not cause unintended issues, like mold or mildew, in the attic space.

 Visit our website to learn more or to schedule your home inspection in the Rochester, Owatonna, and Faribault, MN areas. You can contact us today at (507) 202-8942 or use our online “Schedule Now” feature to set up an appointment.


Concrete, Cracking, And Expansive Soils

There are two kinds of concrete: the kind that has cracked, and the kind that is going to crack...

  How do expansive soils cause problems for concrete slabs?

The freezing temperatures in Minnesota can result in some pretty dramatic heaving, movement, and cracking if the soils beneath a concrete slab aren’t chosen and prepared correctly and don’t have proper drainage. When we perform a home inspection, our inspectors at HomePro Inspections are looking for and documenting any potential issues with concrete slabs.

 What are expansive soils?

Expansive soils are a type of soil that is known for its ability to swell and shrink in response to changes in moisture levels and temperatures. In this part of the country, blue and green clays are problematic. This can cause serious problems for structures built on these soils, as they can crack foundations and damage sidewalks and roads. In order to mitigate the risks posed by expansive soils, engineers typically use special foundations and construction techniques. However, even with these precautions, damage from expansive soils can still be a problem.

 How do expansive soils affect concrete slabs?

When concrete cracks, it's usually because of expansive soil rising and settling. Also known as "swelling clay," expansive soils can wreak havoc on everything from sidewalks and patios to foundations.

 Expansive soils contain minerals that absorb water and expand when wet. This can put tremendous pressure on concrete, causing it to crack and crumble, rise, or settle. In some cases, the damage can be so severe that the entire slab needs to be replaced.

 Correct Base Material

There are several ways to deal with expansive soil, but the most important thing is to make sure that any concrete slab you pour has the correct base materials, appropriate drainage, and is properly reinforced. This will help reduce the risk of cracking and also provide some protection if the cracks do occur. Be sure to consult with a qualified contractor before beginning any concrete project in an area with expansive soils.

 How do freezing temperatures affect expansive soils?

The problem lies in the fact that concrete is porous, meaning that it can absorb water from the ground below. When this water freezes, it expands, putting pressure on the slab above. Over time, this can cause cracks to form in the concrete. In severe cases, the entire slab can even collapse. So, if you live in an area with cold winters, it's important to keep an eye on your concrete slabs and take steps to prevent them from being damaged by freezing temperatures.

 Why is it important to repair cracks in concrete?

Concrete slabs are subject to all sorts of stressors: expansion and contraction due to temperature changes, the weight of vehicles, and even just regular foot traffic. Over time, these stresses can cause cracks to form in the concrete.

 Safety Hazards

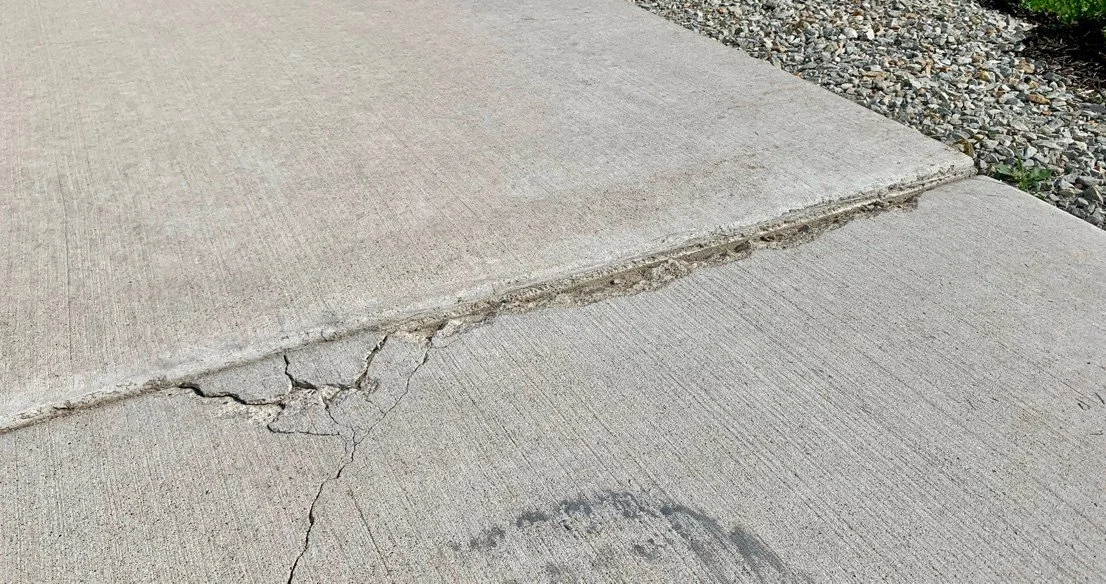
While some cracks are purely cosmetic, others can pose a serious safety hazard. For example, if a crack is deep enough, it can cause a trip and fall accident. In extreme cases, cracked concrete can even collapse and settle entirely. That's why it's important to repair cracks in concrete as soon as they're discovered. By filling in the cracks, you'll not only improve the appearance of your concrete, but you'll also help to prevent further damage due to freeze-thaw cycles. To help our clients, we try to define concrete cracks as maintenance items or recommended repairs in our home inspection reports. This helps to prioritize how these issues are resolved.

 What are the best methods for repairing cracks in concrete?

Concrete is a sturdy material that can last for many years with proper care. However, even the most well-constructed concrete slab is not immune to cracks. While small cracks may not seem like a big deal, they can cause serious damage if left unaddressed. Fortunately, there are a number of effective methods for repairing cracks in concrete.

 Epoxy Resin

One popular method is to fill the crack with a flexible epoxy resin. This type of resin is designed to expand and contract as the temperature changes, which helps to prevent the crack from reappearing. Epoxy resins are available in a variety of colors, so you can also use this method to improve the appearance of your concrete.

 Polymer-based Concrete Leveling Compound

Another option is to fill the crack with a polymer-based concrete leveling compound. This type of compound can be applied using a simple caulk gun, and it will harden in just a few hours. Once it's hardened, the concrete leveling compound will help to level out any uneven surfaces and prevent the crack from spreading.

 Conclusion

Cracks in concrete are not only unsightly, but they can also pose a serious safety hazard. Fortunately, there are a number of effective methods for repairing cracks in concrete. By filling in the cracks, you'll not only improve the appearance of your concrete, but you'll also help to prevent further damage and keep your sidewalks, driveways, and patios safe.

 Visit our website to learn more or to schedule your home inspection in the Rochester, Owatonna, and Faribault, MN areas. You can contact us today at (507) 202-8942 or use our online “Schedule Now” feature to set up an appointment.
 

The Dangers of Ungrounded Outlets and How GFCIs Can Help

What are ungrounded electrical outlets?

Ungrounded electrical outlets (two-prong receptacles) are usually found in older homes that have the original 2-wire ungrounded system. This system was designed with only the hot (black) and neutral (white) wires. In modern construction, a properly grounded circuit requires the use of a 3-wire system that contains a ground wire in addition to the hot and neutral wires and a three-prong outlet. If the ground wire becomes disconnected, a grounded outlet becomes ungrounded.

 Why can ungrounded electrical outlets be dangerous?

Ungrounded electrical outlets are common in many homes built before the early 1960’s. It’s the way homes were built back then. Unfortunately, they pose a safety hazard. An ungrounded electrical outlet doesn’t have a ground wire. This means there’s no path for the electricity to flow into the ground (earth) if there’s a fault. A fault is when something shorts out, and a short can inflict serious injury or death, cause overheating, and spark a fire.

In the 70’s, most new electrical appliances, vacuum cleaners, and such started coming with 3-prong plugs. I remember it was frustrating because you always had to find an adapter, commonly known as a “cheater,” so you could plug the new appliance into the 2-prong outlet. The most common, but incorrect “fix” was to replace the old 2-prong outlets with 3-prong outlets. Problem fixed, right? No way! This is dangerous because if you see a 3-prong outlet, you assume it’s properly grounded, and in this case, it’s not. You still don’t have a ground wire.

What is a GFCI, and how can it help?

The requirement for grounded outlets was introduced in 1962 by the National Electrical Code (NEC, 210-7), and the replacement of ungrounded outlets with grounded outlets was addressed in 1965. In 1984, the NEC amended 210-7 to allow the use of a ground fault circuit interrupter (GFCI) to provide protection for a non-grounded circuit. A GFCI is a device that’s designed to protect people from electrical shocks by monitoring the current flowing through a circuit. If an abnormal imbalance is detected, the GFCI will sense it and trip (open the circuit), instantly de-energizing the circuit. This prevents electrical shocks by interrupting the flow of electricity before it becomes dangerous.

 GFCI Outlet

It’s important to know that on a 2-wire ungrounded system, a GFCI outlet needs to be installed at every outlet to provide proper protection. In this case, every outlet must be labeled “No Equipment Ground.” On a 3-wire system, the GFCI only needs to be installed on the first outlet of the circuit. 

 These explanations are very basic, and there are many considerations regarding electrical codes and the myriad of updates they’ve undergone throughout the years. If you ever have any questions or concerns about the safety of your electrical system, it’s always best to consult with a qualified electrician.

 Conclusion

First and foremost, it's important to understand what an ungrounded electrical outlet is and why they can pose a serious safety hazard. An ungrounded electrical outlet is one that does not have a ground wire connected to it. This means there’s no path for the electricity to flow into the ground if there’s a problem with the outlet or the wiring, which can lead to electrical shocks or cause a fire.

 At HomePro Inspections, we’re trained to identify potential concerns and are always looking for these types of issues when inspecting a home. When found, issues are documented and recommended for resolution by a qualified professional.

 Visit our website to learn more or to schedule your home inspection in the Rochester, Owatonna, and Faribault, MN areas. You can contact us today at (507) 202-8942 or use our online “Schedule Now” feature to set up an appointment.
 

What Happens When You Don't Change Your Furnace Air Filter?

One way to save money on your energy bills and help your furnace run more efficiently is by changing the furnace air filter at least once a month or as recommended by the manufacturer. What can happen if you don’t change it? The air in your home will be dirtier, and so will you. Let’s take a look at how dirty furnace filters impact health, homes, and budgets.

 Reduced Airflow

When a furnace air filter is clogged with dirt and debris, it can seriously obstruct necessary airflow. This prevents the furnace from circulating the volume of air required to keep the house comfortably, efficiently, and economically heated or cooled. 

 Health Issues

A dirty furnace filter can be a breeding ground for bacteria and allergens, which can cause respiratory problems and other health issues.

 Higher Energy Bills

The dirtier and more clogged a furnace air filter becomes, the harder the furnace has to work to circulate the air, and this costs you more in electricity and fuel in the long run. In fact, according to Energy Star, a dirty furnace air filter can increase energy bills by 5% to 15%.

 Premature Furnace Failure

One of the most common problems associated with a dirty furnace air filter is premature furnace failure. When a furnace needs to work harder and longer than necessary, the extra strain can lead to a costly breakdown and the potential need to replace the entire unit.

 Selecting a Furnace Air Filter - Size and Style

When it comes to furnace air filters, there are a variety of different types available on the market. The most important factor to consider when selecting an air filter is the size of your furnace. You want to make sure you get a filter that is the correct size as recommended by the furnace manufacturer.

 Another thing to keep in mind is the type of furnace air filter you select. The most common type of filter is the pleated furnace air filter, which is made of fiberglass or synthetic material. These filters are designed to trap dust and other particulates, making them ideal for people with allergies or respiratory problems.

 If you have pets, you may want to consider a HEPA air filter. There are multiple products available. Do your homework to select the furnace air filter that works best for you. These filters are designed to remove 99.97% of all particles from the air, making them ideal for people with pets or allergies.

 Summary

It's important to replace your furnace air filter on a regular basis, preferably every month, or as recommended by the manufacturer. A clean furnace air filter will help ensure your furnace is running efficiently and also help keep your home healthy. A dirty furnace filter can cause all sorts of problems, from increased energy bills to respiratory problems. So be sure to change your furnace air filter regularly and keep your home happy and healthy.

 As part of a home inspection, our inspectors check to see that the furnace is clean and serviceable and that the air filter is correctly sized. If the furnace fails inspection, we recommend maintenance in our inspection reports.

 Visit our website to learn more or to schedule your home inspection in the Rochester, Owatonna, and Faribault, MN areas. You can contact us today at (507) 202-8942 or use our online “Schedule Now” feature to set up an appointment.

Dryer Vent Fire Hazards

The 2020 National Fire Protection Association (NFPA) statistics show there are between 15,000 and 17,000 fires every year caused by washers and dryers in the United States. Clothes dryer fires injure around 380 people and are responsible for around 50 deaths per year. The leading cause of these fires (34%) is a failure to clean or replace defective dryer vents. As home inspectors, we see a lot of dryer vents that are plugged, damaged, incorrectly installed, or unsafe due to the use of improper materials.

 Personal Story

Several years ago, before I became a home inspector, my wife complained that our dryer was starting to take way too long to dry clothes. Sometimes it took two cycles to dry jeans. She wanted a new dryer. The home was only two years old; how could the dryer be giving us problems already? I did some troubleshooting; the dryer was fine, but the dryer vent was badly clogged with lint.

 In my past homes, the dryer was at an outside wall, and basically less than a foot from the exterior. In this 2-year-old home, the dryer is in the middle of the main floor. While convenient, it creates a problem. The vent pipe goes into the wall, turns downward to the basement, turns horizontal for about 8 feet, turns horizontal again, and extends about 20 feet to where it exhausts to the exterior.

 I disassembled the dryer vent and cleaned it with a dryer vent brush. The result was about one and a half 5-gallon pails full of lint! Needless to say, the dryer started to work perfectly again, and the vent is now cleaned annually.

 Other Contributors

During the course of our home inspections, we come across a variety of issues that can contribute to a potential dryer fire.

 Improper Materials

There are a couple of products on the market for venting dryers that should be used with extreme care. One is a “slinky” type made of shiny mylar materials. These can be a problem because they’re corrugated, which doesn’t allow for the smooth flow of air. The disrupted air flow typically results in accumulated lint and plugging. 

 Another product is the flexible aluminum dryer vent. While easy to use, it doesn’t have a smooth inner surface, and this will lead to accumulated lint and plugging.

Damaged or crushed

Unfortunately, the materials discussed above can easily become damaged. When performing inspections, we often find these types of vents have become crushed or torn.

 In reality, these materials are meant to be used as a transition piece. This means that if you have a short run where a solid metal dryer vent doesn’t line up, these materials are okay to use. Unfortunately, these products come in packages of several feet, and instead of cutting what’s needed for the transition, people just connect the ends and leave an 8-foot “anaconda” stuffed behind their dryer.

Summary

Through proper installation, cleaning, and maintenance, you can do your part as a homeowner to prevent a dryer fire in your home. Even if you feel your dryer is running perfectly fine right now, it’s better to be safe than sorry.

 Use only UL-approved materials, use them properly, and follow your local codes when replacing dryer vents.

 Clean the lint trap in your dryer after every load, and occasionally check the dryer vent exhaust on the exterior of your home. Pay attention to dryer cycle times and, most importantly, have your dryer vents cleaned at least annually.

 Visit our website to learn more or to schedule your home inspection in the Rochester, Owatonna, and Faribault, MN areas. You can contact us today at (507) 202-8942 or utilize our online “Schedule Now” feature to set up an appointment.
 

Understanding Minnesota’s Carbon Monoxide Alarm Requirements in Your Home

The State of Minnesota requires carbon monoxide alarms in your home. There are plenty of misconceptions and misunderstandings regarding CO alarms. Let me explain.

 Carbon Monoxide

Carbon monoxide is an odorless, invisible gas that can be generated by combustible (fuel-fired) appliances in your home. Exposure to carbon monoxide at lower levels can make you feel tired or sick. At higher levels of exposure, carbon monoxide can result in death. 

 Individuals with the highest risk are the elderly, unborn babies, and small children. People with respiratory problems, heart conditions, anemia, and immunity issues are also at a higher risk of death due to exposure to carbon monoxide.

 CO vs. CO2

People often refer to carbon monoxide as CO2. CO2 is carbon dioxide. It’s what we exhale, and it’s used to make your pop fizzy. Remember, carbon monoxide is abbreviated as CO.

 Alarm vs. Detector

A CO alarm is a device typically placed in a home. It has its own power source and sounds an alarm that will alert inhabitants in the event of elevated CO levels. A CO detector is basically the same type of device, but it may or may not include an audible alarm function.

 A CO detector is a common tool utilized by a home inspector to determine if furnaces, water heaters, fireplaces, etc. are potentially leaking CO into the living space.

 Minnesota Carbon Monoxide Codes and Statutes

There’s a lot of code language, so let me try to summarize the basics:

·      The device must be listed with UL 2034

·      A device is required in new homes that utilize fuel-fired appliances

·      Mandatory when there’s an attached garage with an opening to the living space

·      Added to existing homes when listed additions, alterations, or repairs are made

·      Must be on every level, within 10 feet of sleeping areas

·      Located within the sleeping area if a fuel-fired appliance is present

·      Combination smoke/CO alarms are acceptable

·      Unless retrofitting, an alarm must be hardwired

·      For multiple alarms, unless retrofitting, alarms must be interconnected

 Carbon Monoxide Alarms

Again, this is just a summary. Read the full carbon monoxide code requirements and statutes:

 Minnesota carbon monoxide code requirements can be found here:

·       Section R315 of the MN Residential Code.

 Minnesota carbon monoxide statutes can be found here:

·      Sections 299F.50 and 299F.51

 Additional guidance from the EPA regarding carbon monoxide alarms:

·        https://www.epa.gov/indoor-air-quality-iaq/what-about-carbon-monoxide-detectors

·        https://www.epa.gov/indoor-air-quality-iaq/where-should-i-place-carbon-monoxide-detector

 Summary

Tragically, people are still dying every year due to the lack of or non-existence of carbon monoxide alarms. These devices are easy to acquire, easy to install, and are required to help keep us alive. For the safety of your family, make sure you have them properly installed and replaced if they are old or not functioning. Check your carbon monoxide units to make sure they are not past their service life. They usually need to be replaced every 7 to 10 years, depending on the manufacturer.

 Also, be aware of the warning signs of carbon monoxide poisoning, such as headaches, dizziness, feeling sick, and/or lack of energy. Low levels of carbon monoxide in small areas may produce these symptoms in some people before the alarm alerts you of a bigger problem.

 Visit our website to learn more or to schedule your home inspection in the Rochester, Owatonna, and Faribault, MN areas. You can contact us today at (507) 202-8942 or utilize our online “Schedule Now” feature to set up an appointment.


No Power in Your Bathroom?

The power is out... in all your bathrooms... at the same time. What’s going on? The fan still works, and the vanity lights work, but there’s no power at the outlets.

 This can happen on occasion and can certainly be a concern, especially if everyone is getting ready for school or work at the same time.

 An understanding of your home’s electrical system, its workings, and how the electrical code requires bathrooms to be wired can help. Luckily, there’s usually a simple explanation and fix for this scenario.

  Basic electrical requirements for bathrooms

 In short, the International Code Council requires protection to prevent electrical shock in bathrooms. Electrical outlets in bathrooms must be on their own 20-amp circuit and protected by a GFCI (Ground Fault Circuit Protector). If you are not familiar with a GFCI, it helps to keep you from getting electrocuted. You can learn more about how GFCIs work here.

 The bathroom circuit only needs to have one GFCI outlet or breaker to protect all of the bathrooms. This simplifies things for the electrician, but can be confusing for a homeowner. See the image below for a better understanding.

 Checking the GFCI

 Most commonly, the reason for a loss of power in a bathroom is that the GFCI has tripped. It’s good to know which bathroom the GFCI is located in just in case you need to reset it.

 Often times, the electrician will install the GFCI in the master bathroom or the most commonly used bathroom. This isn’t always the case, as sometimes it gets installed where it’s easiest for the electrician.

  There may be an orange or red light glowing on the GFCI outlet, which indicates that the circuit has been tripped, and the reset button will have popped out. Simply press the button to reset the GFCI. You have successfully solved the problem and will be regarded as a hero by your family. Great Job!

 Some things to consider

 If you find a GFCI in one of the bathrooms and it isn’t tripped, it doesn’t mean that this isn’t an issue. Check every bathroom because sometimes a previous homeowner may have installed a GFCI at every bathroom outlet. This is unnecessary; only the first outlet on the circuit needs a GFCI.

 When GFCIs were first introduced, there was usually only one GFCI on the circuit that connected the garage, bathroom(s), and exterior outlets. If the GFCI is not in a bathroom, it may be in the garage.

 As with all things, GFCIs are also prone to failure. GFCIs exposed to high moisture, such as hot steamy showers or high outdoor humidity, may not reset after being tripped. A GFCI that doesn’t reset will have to be replaced.

 Check the panel

 If you can’t find a tripped GFCI, the bathroom breaker in the panel may have been tripped. Hopefully, the breakers in your panel have been properly labeled.

 If you find a tripped breaker, it can be reset by flipping the switch to the off position, then back to the on position. If it resets, you should now have power back to the bathroom circuit.

 In newer homes, there’s a chance there are no GFCIs in any of the bathrooms, and the GFCI may be in the breaker itself. In this case, you will see a yellow button next to the switch on the 20-amp bathroom breaker. The yellow button is the test button. If power is lost, it will be tripped and must be reset as previously described. 

 During the course of the home inspection, we test and reset all GFCIs as well as evaluate the electrical panel. Your home inspector will describe the basics of the GFCIs, the types of breakers in your panel, and what they do.

 If all else fails, call a professional electrician

 If you have power to the panel, every outlet has been checked, and you don’t have a tripped breaker, it may be time to call an electrician. Sometimes a problem can be outside of your skill set. Hopefully, you can solve the problem yourself, but if you can’t, a professional electrician can make the proper evaluation and repairs.

 Visit our website to learn more or to schedule your home inspection in the Rochester, Owatonna, and Faribault, MN areas. You can contact us today at (507) 202-8942 or utilize our online “Schedule Now” feature to set up an appointment.

Should a Homebuyer Waive the Home Inspection?

Homebuyers are becoming overwhelmed and exhausted by the homebuying process in this competitive market, and that’s even before they buy a home! Because of low inventory, sellers are receiving multiple offers on their homes when they list them. Good for the seller, but bad for the homebuyer. One of the tactics being used, in addition to making an offer way over asking price, is to waive any home inspection contingencies.

This is most likely the largest purchase you will ever make

 First-time homebuyers can sometimes be grossly unprepared for homeownership and what’s awaiting them after they buy a home. New homebuyers sometimes forget that when something breaks, they’re on their own. There’s no landlord to call, and it’s not mom and dad’s house.

Paying over the asking price and waiving the home inspection can add substantial financial burdens from future unexpected or latent repair costs. Having a home inspection performed by a professional home inspector, while not a guarantee that everything will be perfect, can greatly reduce the risks of unexpected repairs and costly surprises for new homebuyers in Rochester, MN, Owatonna, MN, and Faribault, MN.

The risks of waiving the home inspection

A recent article published by msn.com states that 77% of homebuyers face unexpected repair costs in the first year of ownership. This startling revelation helps to underscore the importance of enlisting the professional services offered by a trained and impartial home inspector.

Spending half an hour during a showing or walkthrough with your dad or uncle “who knows things about construction” isn’t going to provide you with complete and objective insight into the condition of the home. By no means am I knocking dads and uncles, but I’ve seen a few that work in the construction business make an effort to point out everything that’s “not up to code.” While on the surface that may seem fine, in reality, it’s irrelevant for every home except brand new construction. Truth be told, codes change about every three years. A quick review of a home and the observance of some perceived code issues should never substitute for a thorough, professional home inspection. 

Utilizing a qualified home inspector to conduct a comprehensive home inspection will open your eyes to potential safety, health, and financial risks associated with the purchase of a new home. Home Inspectors have the required knowledge and tools to provide an honest, non-biased assessment of the condition of the home on the day of the inspection.

Get a home inspection anyway

 There are ways around waiving a home inspection contingency without losing an offer. One option is to present your offer to include a home inspection “for informational purposes only.” This doesn’t hold the seller responsible for any repairs or costs and can make sellers more likely to accept your offer. If there are any major issues pointed out by your home inspector, you can still back out if your realtor has worded your contract appropriately.

 Another option that we are seeing from homebuyers is a post-purchase inspection. By having a home inspection conducted after the fact, your home inspector will help you understand any issues or repairs that are needed. 

Home Inspections

The bottom line? When it comes to a home inspection, you’re not simply spending a few hundred dollars; you’re making a prudent decision to protect your home and future financial security. Whether a home inspection is part of your contingency or not, it’s always a wise investment when it comes to homeownership. No one wants to buy a money pit. Even if there are no major issues, you may learn some basic home maintenance, what makes your home tick, and maybe even create a future ‘honey-do’ list.    

  Visit our website to learn more or to schedule your home inspection. You can contact us today at (507)202-8942 or utilize our online “Schedule Now” feature to set up an appointment.


Is Your Passive Radon Mitigation System Good Enough?

Radon Mitigation

Knowing if your home has a radon mitigation system, and whether it's a passive or active system, is important. It's also important to know if the radon mitigation system in your Rochester, MN, Owatonna, MN, or Faribault, MN home is working correctly. When it comes to the health and wellbeing of your home and family, correct testing and accurate determination of radon levels is an essential process best left to licensed, experienced professionals.

 Since 2009, Minnesota has required that all new homes are built to be radon-resistant. New home construction must use techniques and materials to help reduce or prevent radon from entering the home. This is known as a passive radon system which relies on the natural upward thermal flow of sub-slab air and soil gases through a pipe and exhausted to the exterior of the home.

 What is a Passive Radon Mitigation System?

 A passive radon system starts with a perforated tile system set in a permeable soil, such as gravel or pea rock. This layer is covered and sealed with plastic before the concrete floor is poured. The system is sealed and vented, typically through a 3- or 4-inch PVC pipe. This pipe extends from under the concrete slab your home is built upon up through the home and attic space to the exterior. A passive system relies on the thermal stack effect, which means the system will naturally draw air upwards. The home acts as a vacuum on the soil due to internal/external temperature differences. There are many factors, including weather, storms, winds, barometric pressure, and types of construction, but that’s another discussion best left for another time.

 Could a passive radon system not be adequate enough?

 There are several factors that may result in a passive radon system not performing well enough to effectively reduce the radon gas levels in your home. Sometimes, systems are inadvertently obstructed during the construction process. An unobstructed system is critical for adequate and consistent air flow from under the slab.

For example, my home, built in 2017, is a 1-story slab on grade with a passive radon system installed. I oversaw the installation and confirmed that it was installed correctly. After living in my home for a few months, I tested the radon gas levels, and they came in at an average reading of 3.2 pCi/l to 3.8 pCi/l, depending on the season. This is pretty close to the EPA Action Level of 4.0 pCi/l.

Does this mean my home's system wasn’t built well? No… it means that the release of radon gas from the soils below my home is greater than what the passive system can handle. I’m sure there are cold and windy winter days where the average is above 4.0 pCi/l 

Is the system working good enough? The radon measurements are below 4.0 pCi/l, so some may say yes, the system is working as designed. Some may answer no, because the radon average measures pretty close to 4.0pCi/l. The honest truth? Even the best designed and installed passive system may not be adequate in all homes.  

In summary, a passive radon mitigation system doesn't always guarantee that your home is safe from dangerous levels of radon gas. The only way to accurately know the radon levels in your home is to have it tested.  HomePro Inspections employs the licensed and certified professionals required to ensure radon testing is performed correctly and all testing protocols are met.

Visit our website to learn more or to schedule radon testing for your home. You can contact us today at (507) 202-8942 or utilize our online “Schedule Now” feature to set up an appointment.


Radon Testing is the only way to know the accurate radon levels in your Rochester, MN, Owatonna, MN, or Faribault, MN home.

Did you know that the device pictured above IS NOT measuring the radon gas level in your home? This is a common misconception for homeowners and realtors alike, but what’s pictured here is a manometer. It’s an important part of your home’s radon mitigation system, and we’ll discuss why it’s there and how it helps to ensure your system is operating appropriately.

 What is a manometer?

 A manometer is a device used to display how much vacuum your radon mitigation system is drawing. A fan in your attic pulls subsoil gases from under the concrete slab your home is built upon and exhausts them into the atmosphere. The manometer provides a quick visual reference to indicate if vacuum is being created and your system fan is running properly or not.

 When the mitigation system is running properly, the liquid in the manometer tube will be offset typically anywhere from .5 to 1.75 inches. If the system fan is not running, the fluid will rest at zero on both sides. If your fan is running and the fluid is at zero, the system needs service, as there is no longer any vacuum being drawn.

 The dangers of radon gas.

 Radon is an odorless, tasteless, naturally occurring gas that enters your home through the ground from beneath and around it. The U.S. Surgeon General advises that radon gas is dangerous and is the second leading cause of lung cancer. Having a properly operating radon mitigation system helps to pull these gases out from under your home.

Testing Requirements

 The EPA Home Buyer’s and Seller’s Guide recommends recommends conducting post-mitigation radon testing every 2 years in all previously tested locations. In addition, if the home has been altered, and in conjunction with any sale of the property radon testing should again be performed. Nothing remains constant, and conditions change over time. The manometer alone does not ensure that a radon mitigation system is operating as designed. Only radon testing can do that.

 In summary, the only way to know the accurate radon levels in your home is to have it tested. HomePro Inspections employs the licensed and certified professionals required to ensure radon testing is performed correctly and all testing protocols are meticulously met.

 Visit our website to learn more or to schedule radon testing for your home. You can contact us today at (507)202-8942 or utilize our online “Schedule Now” feature to set up an appointment.