Air Leakage in Your Home

Owning a home can be expensive. There always seems to be something to fix, repair, or replace. The list of monthly expenses can add up in a hurry, and utility bills can be a big part of those monthly expenses.

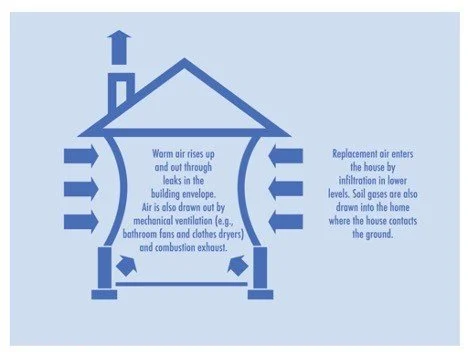
 The illustration above demonstrates the common areas of air infiltration into and out of a home.

Focusing on energy efficiency in your home can add up to savings. People usually catch the easy ones, like shutting off lights, pulling shades or curtains to keep the sun out, and trying not to waste water. Some of these issues may be pointed out by your home inspector during the course of a home inspection.

 Air Leakage Explained

One of the least understood energy wasters in a home is air leakage. These are all of those little gaps, cracks, seals, and openings in your home that let air leak into and out of the conditioned space of your home. It may not seem like much, but every little bit of air leakage adds up to wasted energy and, in extreme cases, difficulty keeping some areas of your home comfortable.

 Energy efficiency methods in home construction have advanced greatly over the years. We have all heard about how “tight” new homes are. This is a result of products like house wraps, foam sealants, and even things as benign as the electrical boxes that house switches, lights, and outlets. Newer construction does a far better job at addressing air leakage than homes built in the past when energy was cheap.

 Common Areas for Air Leaks

Windows, doors, exterior wall penetrations, light fixtures in the ceiling, as well as ducts, fireplaces, pet doors, and vents, are some of the most common areas where air leakage can occur in your home.

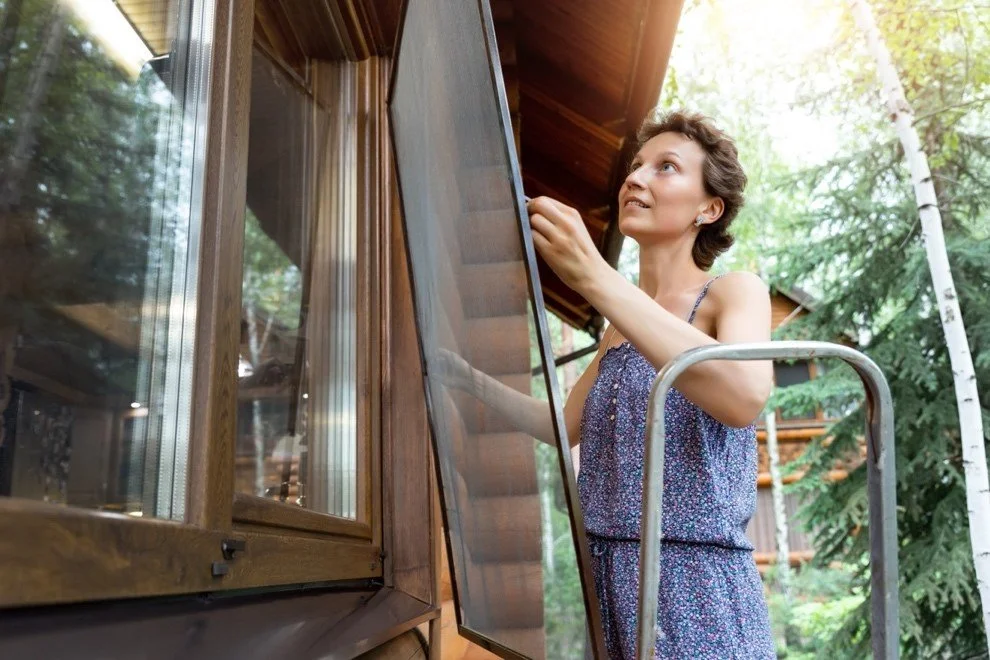
 By performing an inspection on your home, many of these troubled areas can be discovered. Obviously, if you see a gap between your front door and its frame, it is an air leak and should be resolved. Weather stripping can be either added or replaced to seal these kinds of gaps. Sometimes you may notice that curtains move slightly when the wind blows. Inspecting your windows for air leaks and repairing them can add up to a lot of savings.

 There are some areas in your home, however, where air leaks are not so easy to see. One option is to hire a specialist who can perform a blower door test to evaluate your home’s energy efficiency. The process of a blower door test places an insert in a doorway that contains a fan that pulls a suction on the house. This allows the technician to calculate the air loss based on pressure differentials. Using other tools, such as an infrared camera, will help the technician locate areas where outside air is being drawn into the home. A visual home inspection by the blower door technician may also uncover problem areas.

 Blower door installed at the front door of a home

Low-Air Leakage Pros and Cons

Reducing uncontrolled air leakage will save you money. In the summer, when it is hot and humid, air leakage allows hot air to come into the house and the cool, conditioned air to leak out. Under these conditions, your air conditioning has to work extra hard to maintain the ideal temperatures in your home. In the wintertime, the cold air gets in and the heated air escapes. The end result in either case is higher energy bills and added wear and tear on your air conditioning and heating equipment.

 An airtight home improves your energy efficiency and helps you save money. Reducing air leakage means that your home maintains a pleasant, comfortable environment with fewer fluctuations in temperature.

 In humid areas of the country, the continuous drawing of moist air into a home can lead to potential mold issues that can affect the health of the home’s occupants. If the moisture intrusion is severe and continuous, it can result in interior damage within the walls and costly repairs.

 One of the biggest concerns about an airtight home that has been realized over the years is the decrease in natural ventilation. With reduced ventilation, airborne particles, dust, mold, and germs can build up inside the home, creating poor air quality. Sometimes this can become extreme enough to create what is called a “sick home.” This is obviously a legitimate concern and must be balanced to optimize energy efficiency and not compromise the healthy air within the home.

 Proper ventilation is important when it comes to airtight homes. A concept that builders use is “Build Tight, Ventilate right.” There are two systems that are used in new construction that help to maintain proper ventilation within a home. Heat Recovery Ventilators (HRV) and Energy Recovery Ventilators (ERV) are systems that manage the air exchange within the home by pulling fresh air from the outside and expelling stale air from the inside.


 Maintaining this equipment is crucial to its proper operation. Our home inspectors commonly find HRVs and ERVs that are either poorly maintained or, in some cases, have never been maintained. The filters and the heat exchangers may have dust and insects built up to a point where the system is nearly or completely plugged. Again, this is wasting energy as well as creating wear and tear on the system. Poorly maintained systems are called out as in need of attention on our home inspection reports.

 Summary

Uncontrolled air leakage into and out of your home can be costly and inefficient. Performing a visual home inspection will uncover some of the more obvious issues within your home. If you want to fine-tune and optimize the heating and cooling efficiency of your home, you may want to hire a professional to perform a blower door test.

 At HomePro Inspections, our home inspectors are trained to inspect all areas of the home. When performing a home inspection, our home inspectors are looking for obvious issues regarding air leakage. These areas of concern will be documented on your home inspection report and recommended for resolution.

 Visit our website to learn more or to schedule your home inspection in the Rochester, Owatonna, and Faribault, MN areas. You can contact us today at (507) 202-8942 or utilize our online “Schedule Now” feature to set up an appointment.

Window Screen Maintenance Tips

Window screens are an essential part of a home in most areas of the country. During moderate weather, they allow you to open your windows and let the breeze flow through while keeping debris and insects out. Unfortunately, screens are one of those components that are sometimes poorly or improperly maintained.

 Removing a window screen from its frame

 Window screens take a lot of abuse. Over time, cobwebs, dirt, pollen, and bugs can accumulate. The weather and sun can also take their toll on the components of the screens. An annual inspection of your home’s exterior, plus some cleaning and maintenance, will help to keep your home’s window screens in good condition and working properly.

 Window Screen Dos and Don’ts

For the most part, window screens are pretty sturdy and have few moving parts. Annual maintenance and a few basic guidelines will help keep your window screens clean and looking good.

 Things you should do:

·         Anything big that attaches to your window screens should be removed immediately. Large cobwebs, leaves, or bird “exhaust” should be cleaned off sooner rather than later. Some window screen materials can be prone to rust or mold if left unchecked. It will also make annual cleaning easier.

 ·         Choose the proper cleaning supplies. Window screens can be made of metal, nylon, or fiberglass. Choosing the proper cleaning detergent and methods will help protect your window screens and aid in cleaning.

 ·         Repair versus replacement can cause some confusion. If your window screen has a small hole or tear, it can be repaired with a window screen repair kit. If the frame is fine but the screen material has large damage, have the window screen material replaced.

 Damaged window screen

 Things you should not do:

·         Do not use a pressure washer. The force from a pressure washer is too strong, even at its lowest setting, for most window screen materials. The pressure will prematurely wear the window screen materials and/or the frame.

·         Stay away from harsh cleaning solutions or chemicals. A mild soap solution, vinegar, and warm water will handle most cleaning needs on your window screens.

 Remove Your Window Screens for Winter

People rarely open their windows during the winter months. Even if they are opened, the chances of bugs and debris are less likely when it’s freezing outside. Winter weather can also be damaging to your window screens. High winds, sleet, and ice can damage your window screens.

 It is best to remove your window screens in the late fall to protect them from exposure to the harsh winter elements. Removing your window screens also helps brighten the interior of your home during the months that experience the least natural light.

 How to Clean Window Screens

After a long spring and summer, your window screens can be a bit dirty. Inspecting, cleaning, and maintaining your window screens in late fall is the best. They performed their job diligently through spring, summer, and early fall to keep debris and insects out. Taking care of this chore now allows you to store your window screens when they are clean and ready for spring.

 Things you need:

·         Large beach or bath towels

·         Vacuum cleaner with soft brush attachment

·         Bucket of warm soapy water or a mixture of white vinegar and water

·         Sponge or washcloth

·         Garden hose with spray attachment

 Cleaning steps:

·         Vacuum your window screens. Remove the window screen and lay it on a large towel. This will help protect your window screen from damage and scratches. Use the vacuum with a brush attachment to gently vacuum debris from both sides of the window screen as well as the frame and edges.

 Take the time to vacuum out the window frame. There can be a lot of debris buildup that, over time, can make it difficult to remove and replace the window screen. Use soap and water to remove anything left behind after vacuuming.

Dirt and debris on the window screen and frame

 ·         Wipe down your window screens. Use that bucket of warm, soapy water and a sponge. Even after vacuuming, there will be a lot of dirt on your screens. Change out your soap and water as needed; it’s going to get dirty a lot faster than you think. I have found that dish soap works really well for cleaning window screens.

 Keep in mind that all the gunk and debris you are vacuuming and washing away is the stuff your window screens kept from getting inside your home!

 ·         Rinse your window screens. After everything is cleaned, gently rinse your window screens. It works best if you can lean them up against something vertically. Make sure you rinse all debris and residue from the window screens to prevent any buildup. Keep the water pressure low and avoid aggressive spraying to prevent damage to your window screens.

 ·         Dry your window screens. As you are drying your window screens, make sure to do a thorough inspection for any missed debris or damage. Use a towel to gently pat down and dry your window screens, or if you have a nice sunny area, it’s ok to let them air dry. After everything is dry, store your window screens somewhere out of the elements until spring.

 Summary

Annual inspection, cleaning, and winter storage will help keep your window screens performing at their best for you for years to come. Taking care of this maintenance chore in the late fall will give you a leg up on your spring cleaning chores.

 At HomePro Inspections, our home inspectors are trained to inspect all areas of the home. Deferred maintenance and damage to your window screens can turn a relatively simple project into a more serious repair when left unchecked. Any issues found are documented in your home inspection report and recommended for resolution by a qualified professional.

 Visit our website to learn more or to schedule your home inspection in the Rochester, Owatonna, and Faribault, MN areas. You can contact us today at (507) 202-8942 or utilize our online “Schedule Now” feature to set up an appointment.

Maintenance Checklist for Summer

Summer is a time for fun and family. You want to make the most of your time and not spend it working around the house. It always seems that there are other priorities. Attending to your summer home maintenance checklist early will save you time, money, and headaches down the road. Below are a few maintenance items you may want to consider to better protect your home.

 Indoor Maintenance

 ·        Clean, inspect, and reverse the rotation of your ceiling fans.

Dusting your fans regularly will help them better move the air in your home. Inspect your fans for dust buildup, loose blades, vibrations, and wobbling. Wobbling will add additional stress to the motor fan bearings, resulting in increased wear.

 Be sure that your fan blades are rotating counterclockwise in the summer, pushing the air towards the floor. This can help reduce the room temperature by up to 8 degrees. In the winter, you want to change the fans to turn in a clockwise rotation.


·        Inspect for leaks at your doors and windows.

Reducing energy bills and your impact on the environment should be a goal for every homeowner. Allowing your conditioned indoor air to leak out is bad for your energy efficiency. Inspect the seals and weatherstripping on your doors and windows. If you are a DIYer, replace or repair as needed, or call a window contractor.

 ·        Clean your air ducts and vents.

Perform an inspection of all exhaust fans, ventilation systems, dryer exhaust, and your HVAC air ducts and returns. Over time, dust builds up, restricts flow, and ultimately reduces efficiency and increases energy consumption. Clean ducts and vents help to aid efficient exhaust and improve the circulation of the air in your home.

 ·        Inspect and test your smoke and carbon monoxide detectors.

Regular upkeep and inspection of your smoke and carbon monoxide detectors helps ensure your family’s safety. Replace batteries when needed, and if your smoke detectors are more than 10 years old, they should be replaced.

 Outdoor Maintenance

·        Service your air conditioner.

It’s a good idea to have your air conditioning system serviced annually. There is nothing worse than coming home on a hot and humid day to find your air conditioner has stopped working. Emergency service calls can be expensive, and you may have to wait a day or two to get someone to your home for repairs. Periodic cleaning and care of your condensate line will help prevent overflows into your home. Having your system maintained regularly can save you headaches and money in the long run.

 ·        Inspect your home’s siding and trim.

The seasons can take a toll on your siding and trim. Making any necessary repairs, sealing up cracks and openings, and removing mold and dirt from your siding will increase its life. Using a pressure washer and products specific to cleaning your siding will make this job easier. In addition to curb appeal, keeping your siding maintained will help protect your home from the elements.


·        Clean your gutters and downspouts.

This is not a fun job, especially if your home has more than one level. Gutters and downspouts play a key role in directing water away from your home. If you are not comfortable doing this yourself, hire a professional.

 ·        Spruce up your landscaping.

Replace any shrubs or plants that may have been damaged due to the winter or drought. Trim all branches and limbs away from your home so that they do not rub on the shingles or siding. Check branches on trees for damage and trim or remove them if necessary. Bigger projects should be left to professionals if they are close to power lines, fences, or other structures. Proper landscaping can also keep bugs and critters away from your home. If you find any insect infestations in your landscaping, call a professional to resolve the problem.

 Summary

Your home is probably your most important asset. Keeping your home’s systems maintained and properly functioning will manage costs and keep your home looking good.

 At HomePro Inspections, our home inspectors are trained to inspect all areas of the home. Deferred maintenance can turn a relatively simple project into a more serious repair if left unchecked. Any issues found are documented in your home inspection report and recommended for resolution by a qualified professional.

 Visit our website to learn more or to schedule your home inspection in the Rochester, Owatonna, and Faribault, MN areas. You can contact us today at (507) 202-8942 or utilize our online “Schedule Now” feature to set up an appointment.

The Importance of Egress Windows

Most people, including Realtors, have heard about egress windows. Unfortunately, these safety features are often misunderstood.

 Egress window and window well

 We sometimes hear that a basement bedroom may be “non-conforming” due to the lack of a method of egress. What exactly is egress? The dictionary defines egress as “the action of going out of or leaving a place.” In a residential environment, proper egress means that an occupant has a safe and accessible way to evacuate a space, usually through a window.

 This subject comes up with clients regarding basement bedrooms during the course of a home inspection, usually with older homes built before egress requirements were set in place. Sometimes, basements that were meant for storage have had a bedroom added, and there is no safe egress from the room.

 Not having proper egress from a basement is a safety concern. You want to make sure that anyone dwelling in that space has a safe and accessible escape to the outdoors in the event of a fire or other type of emergency.

 Why are egress windows necessary?

The main reason for egress windows is safety. Egress windows allow people to get safely out of a home and emergency services, such as firefighters, to access the home. Egress windows also provide natural light and allow for fresh air and ventilation in a basement space.

 Egress windows in a basement are important as an alternative escape from the structure. If there were a fire that obstructed the basement stairwell, an egress window would allow you to safely exit the building. The International Residential Code requires that there be a minimum of one egress window per bedroom and living space.

 What is a proper egress window?

The minimum requirements for basement egress windows are spelled out in Sections R310 of the International Residential Code, Emergency Escape and Rescue Openings.

 ·         The egress escape must lead to a yard, public space, or courtyard.

·         The egress exit must be operable from inside the room without tools or specialized knowledge.

·         The opening width shall be a minimum of 20 inches.

·         The opening height shall be a minimum of 24 inches.

·         The bottom edge of the opening must be no greater than 44 inches from the floor.

·         The “net clear” opening of the exit shall be at least 5.7 square feet.

 Since basements are partially or fully underground, egress windows will generally exit into a window well. The IRC spells out specific requirements that window wells must also meet. Section R310.4 addresses these specifications for area wells.

 ·         The horizontal area of the window well shall be at least 9 square feet.

·         The horizontal projection of the window well shall be at least 36 inches.

·         The window well shall allow for the window to be fully opened.

·         Window wells greater than 44 inches deep shall have a permanent ladder or steps.

·         Window wells shall have proper drainage and must tie into the foundation tile system.

·         Bars, covers, grills, or screens must be removable without tools or specialized knowledge.

·         Bars, covers, grills, or screens must meet the net-clear opening requirement of 9 square feet.

 Summary

Egress windows and window wells are an important part of keeping your home safe. Making sure that you keep any egress windows clear, maintained, and properly functioning will help to keep your family safe in the event they need to get safely out of a basement.

 When performing a home inspection, our inspectors review any egress windows and window wells if they are part of the home.

 At HomePro Inspections, our home inspectors are trained to inspect all areas of the home. Any issues found are documented in your home inspection report and recommended for resolution by a qualified professional.

 Visit our website to learn more or to schedule your home inspection in the Rochester, Owatonna, and Faribault, MN areas. You can contact us today at (507) 202-8942 or utilize our online “Schedule Now” feature to set up an appointment.

Potential Dangers of Lead-Based Paint in Your Home

As with many products used in our homes in the past, we find over time that there may be potential health issues related to exposure. Lead is toxic; we all know that. Over time, efforts have been made to eliminate the use of lead and educate people on the potential hazards of exposure to lead and lead-based paint.

 Peeling paint on door and walls

 For many years, lead-based paints were the standard in homes across the country. It was a good product, and it was durable. As we learned about the health hazards associated with exposure to lead-based paint, we started to eliminate its use in homes. Lead paint was banned in 1978, so if your home was built before that, you may very well have lead-based paint in your home.

 Why was lead added to paint?

Occurring naturally, lead is a metal element in our earth’s crust. Lead is toxic and can result in serious health-related issues for humans and animals, such as your pets.

 Lead is number 82 on the periodic table of elements

 Lead also has many desirable characteristics and benefits. Lead is highly malleable, ductile, and resists corrosion. Lead was used in many products in and around homes in the early 1900s. Lead was used to make water pipes, waste pipes, solder, paint, flashings, and cosmetics.

 Lead was added to paint to give it a quicker drying time, durability, help prevent moisture-related corrosion, and provide a lasting, shiny new appearance.

 Lead is a proven health hazard.

Lead has been shown to contribute to several health-related issues that can damage the nervous system, kidneys, brain, and reproductive system in humans. Children and pregnant women are at the highest risk of health-related issues from lead exposure. Lead can also stunt growth and development in children.

 The body of a child will absorb more lead than that of a fully grown adult, according to the EPA (Environmental Protection Agency). Also, children are more likely to put an object in their mouth. Some of these objects in older homes may have the potential to contain lead. Paint chips, for some reason, seem to be something that a child will put in their mouth, chew, and swallow. As we discovered the negative effects of lead-based paint exposure, the government stepped in.

 Lead-based paint is banned.

The government banned consumer use of lead-based paint in 1978. If you have a home built before 1978, it is likely that there is lead-based paint in your home.

 Statistics show that 87% of homes built before 1940 have a high likelihood of having lead-based paint. That number is 69% for homes built between 1940 and 1959 and 24% for homes built between 1960 and 1977.

 Older homes that have been updated or renovated more than likely have several coats of lead-free or latex paint over the top of the old lead-based paint. We tell our home inspection clients that as long as you do not disturb the old lead-based paint, you will be fine. However, if they engage in a home renovation project or decide to strip the paint off of the old wood trim, they need to do their research, take proper precautions, or hire a professional.

 The EPA has published a guide, Protect Your Family From Lead in Your Home, that will help you understand the risks associated with lead in your home.

 In 1992, Congress passed the Residential Lead-Based Paint Hazard Reduction Act. This set of laws requires that known information regarding lead-based paint or lead-based paint hazards be disclosed as part of the sale or lease of a home if the home was built before 1978.

 This bill states that landlords or home sellers are required to meet certain requirements as a result of a sale or lease:

 ·         Provide the EPA’s guide regarding lead-based paint.

·         Disclose any known lead-based paint hazards.

·         Provide any historical records or reports of the home’s lead-based paint hazards.

·         Provide a signed and dated attachment stating that the home seller or landlord has complied with all lead-related requirements as a part of any contract or lease.

·         Sellers must allow potential buyers adequate time to conduct lead testing if requested.

 Summary

Lead-based paint is a potential hazard to you and your family. Taking the proper precautions when performing any remodeling is key and can be managed.

 Although lead-based paint testing is outside of the scope of an inspection, testing can be added for an additional fee. When performing a home inspection, our inspectors will address any questions regarding lead-based paint and guide our clients to seek out the education and precautions necessary in the event of any remodeling questions.

 At HomePro Inspections, our home inspectors are trained to inspect all areas of the home. Any issues found are documented in your home inspection report and recommended for resolution by a qualified professional.

 Visit our website to learn more or to schedule your home inspection in the Rochester, Owatonna, and Faribault, MN areas. You can contact us today at (507) 202-8942 or utilize our online “Schedule Now” feature to set up an appointment.

Understanding R-Values for Varying Insulation Products

Proper insulation in your home will keep you warmer in the cold months, cool in the hot months, and can save you money. Understanding R-values and applying that knowledge to your home can help you optimize your home’s energy efficiency.

 The EPA calculates that a typical homeowner can save up to 15% on annual heating and cooling costs by applying insulation and sealing their home in the right areas. You can check out the EPA Energy Star site to understand why you may want to seal and insulate, energy efficiency methodologies, and defining problem areas.

 As with most products, there are several different types of insulation available for almost every application and scenario. Using the right product to optimize the R-value is the key to increasing energy efficiency.

Explaining R-Value

The R-value associated with insulation products is a rating given with respect to the insulation’s resistance to heat flow. What that means is how well the insulation prevents the movement of heat flowing into or out of your home.

 Higher temperatures move to lower temperatures, so that means we want to keep the heat from escaping from our homes in the colder months and from getting into our homes in the hotter months. Insulation and its R-value play a big part in controlling that energy flow. The higher the R-value, the higher the resistance to heat flow, which leads to better performance.

 Choosing the best product

Depending on whether you live in the northern part of the country or in the south, R-value recommendations will vary. Choosing the right product to meet your needs and meet recommended R-values is not a one-size-fits-all solution.

 The United States Department of Energy has developed recommendations for the types of products and recommended R-values across several regions of the country. In general, this means that what is required for International Falls, Minnesota, will be different from Miami, Florida. The map below shows regional R-value recommendations.

R-Value recommendation map sourced from EPA Energy Star

 Within each zone, there are R-value recommendations for specific systems in the home. Attics will have a higher R-value recommendation than floors, for example. The chart below has the specific recommendations for each of these zones as shown on the map above.

 R-Value recommendations for specific home systems – homedepot.com

 By using the guidance above, you can make decisions on materials for your next insulation project or confirm that the systems in your home are adequately insulated.

 Typical insulation types and R-value ratings

 Blown-in or loose-fill insulation

This type of insulation is typically an attic application. The insulation materials are loaded into a machine that mixes and fluffs them up so they can be blown into an attic space. This process allows for access to hard-to-reach areas and is relatively cost-effective. Fiberglass and cellulose are the primary materials used for this process.

 Blown-in fiberglass insulation application

 Fiberglass loose-fill insulation is primarily glass that is spun to make the fibers that make up the loose fill. Fiberglass insulation resists moisture absorption, which helps to resist mold, mildew, and other fungal issues. It does not do much with respect to air leakage or the sealing of gaps or openings. Fiberglass loose-fill insulation averages an R-value of R-2.2 to R-3.8 per inch of application.

 Cellulose loose-fill insulation is made up of recycled cardboard and newspaper, which is additionally treated with chemicals that make it resistant to fire, rodents, and other pests. Cellulose insulation works well to settle in and combat air leakage. In studies using blower door testing, cellulose loose-fill insulation has one of the highest resistances to air leakage.

 Cellulose is a bit less DIY-friendly. It is harder to install and very dusty. Over time, the product settles, which reduces its overall R-value. Cellulose R-values tend to be higher than fiberglass’s, ranging from R-3.2 to R-4.0 per inch.

 Airborne particles from both fiberglass and cellulose can pose a health hazard to people when they are installing them. As with all products, installers should make sure they are using the recommended PPE (personal protective equipment) when installing.

 Insulation Blankets

Insulation blankets are typically the most inexpensive insulation options. Commonly referred to as “batts,” this product comes in rolls that can be cut to the desired length. Batts are also designed to fit between wall studs, attic joists, or floor joists, come in varying thicknesses, and are typically made of fiberglass. Insulation blankets are DIY-friendly and easy to install.

 Fiberglass batts come either with or without a vapor barrier attached to them. The downside to fiberglass batts is consistent installation, especially around the edges and corners. R-values for insulation blankets range from R-2.9 to R-4.3 per inch of thickness.

 Fiberglass insulation installed in a wall structure

 Spray Foam

Spray foam insulation is designed to both insulate and reduce air leakage. This product is sprayed into place, where it expands, seals, and hardens. Spray foam installation requires specialized equipment and is not typically a DIY application. Spray foam works well in most applications. The downside is that it is one of the most expensive alternatives, but it has a higher payoff in the long run. R-values for spray foam range from R-3.5 to R-6.5 per inch, depending on whether it is an open- or closed-cell product.

 Installing spray foam to a wall structure

 Foam Board Insulation

Foam board insulation, like spray foam, has a high resistance to heat flow and leakage. The tight pore structure of foam board makes it resistant to moisture intrusion. We typically see this type of foam installed on the perimeter of basement walls. Foam board insulation typically comes in 4x8-foot rectangular sheets that are easy to work with and cut to size. While providing high R-values, foam board insulation does not do a very good job of sealing cracks or openings. It has R-values that range from R-4.0 to R-6.5 per inch of thickness.

 Summary

Insulation is an important component that can save you money while protecting you from outdoor temperatures. Choosing the right product for your needs is important when updating or replacing insulation in your home.

 At HomePro Inspections, our home inspectors are trained to inspect all areas of the home. When performing a home inspection, our home inspectors observe and document the type and approximate depth of the insulation where it is accessible. Recommendations are made depending on our findings.

 Visit our website to learn more or to schedule your home inspection in the Rochester, Owatonna, and Faribault, MN areas. You can contact us today at (507) 202-8942 or utilize our online “Schedule Now” feature to set up an appointment.


Understanding GFCI Outlets

GFCI outlets. We see them in our homes, but few people understand what they are, how they work, or why they are there. GFCI stands for Ground Fault Circuit Interrupter.

 A GFCI outlet with test and reset buttons

 The Shocking Details

I know that during the course of my life, I’ve had my share of electrical shocks, more in my youth than later in life. It could be for a couple of reasons, like because I’m less careless or because our home’s electrical systems have some safeguards we didn’t have when I was a kid.

 A GFCI is a device within an electrical circuit that will disconnect or interrupt the circuit in the event that an unbalanced current, or fault, is detected between the hot conductor and the neutral conductor. This imbalance may be caused, for example, by current traveling through a person who has come into contact with the circuit and is in contact with the ground. A GFCI will trip and break the circuit with as little as 5 milliamps of imbalance.

 Most shocks are minor and usually don’t result in injury or, worse, death. Your muscles usually react to the shock, causing you to jump or jerk, thus breaking the circuit. In some cases, though, a shock can be much more serious, resulting in tissue damage and burns. In the worst case, an electrical shock can cause heart failure or death.

 GFCIs Explained

The sole purpose of a GFCI outlet is to protect people and reduce the risk of electrical shocks. GFCIs are different from the circuit breakers in an electrical panel. Circuit breakers are designed to protect against circuit overload and will trip if there is too much current running through the circuit. Too much current may result in the wiring overheating and causing a fire.

 A GFCI outlet has an internal circuit that measures the balance of the current amperage flowing into and out of the circuit. If this circuitry detects a difference in the power on the hot side versus what is returning on the neutral side, the GFCI will trip instantaneously, thus interrupting the power to that circuit.

 GFCI outlet diagram

 If you accidentally become part of that circuit, the GFCI will detect an imbalance between the hot and neutral (because the power is traveling through you), creating a fault. It will trip the circuit. If you are being shocked, a standard breaker may or may not trip quick enough to save your life. The Consumer Products Safety Commission has provided this GFCI Fact Sheet for additional information.

 GFCI Requirements

The National Electrical Code began requiring GFCIs in certain applications as far back as 1968. Over the years, GFCI requirements have included kitchens, bathrooms, laundry areas, unfinished basement spaces, garages, and exterior electrical applications. Most recently, GFCI requirements have included some appliances such as sump pumps, water heaters, and washing machines. Basically, if there is the potential to come into contact with water, a GFCI is required. For more information, you can refer to the 2020 Minnesota Electrical Codes and Standards.

 GFCI Outlets and Home Inspections

GFCIs come up for discussion at most home inspections. Our home inspectors document where GFCIs are located in the home as well as where they should be located. We also test and reset all GFCIs to make sure they operate properly. If a GFCI is defective or missing, we document this in your home inspection report.

 One of the topics of discussion in older homes is the lack of GFCIs at the proper locations. The question is usually whether or not they are required because the house was built before GFCIs were invented or required. We typically call out the areas that should have GFCIs and stress that, for the relative cost versus the increased safety for your family, GFCIs should be added.

 Another issue is GFCIs that are old and will not trip, or, when a home inspector tests and trips the GFCI, it will not reset. This is also a hazard because the GFCI is there to provide protection. When GFCIs are exposed to high humidity or exterior elements, the contacts may corrode, resulting in a GFCI that may not do its job. Our home inspectors will share that GFCIs should be tested (tripped and reset periodically) to ensure they are operating properly.

 Summary

GFCI outlets are an important part of your home’s electrical system and provide a high level of safety as long as they are in the proper locations and operate properly. As a homeowner, you can do your part to ensure safe operation by taking the time to test your GFCIs and replace them if they are defective.

 At HomePro Inspections, we are trained and always look for these types of issues when inspecting a home. Any issues are documented and recommended for resolution by a qualified professional.

 Visit our website to learn more or to schedule your home inspection in the Rochester, Owatonna, and Faribault, MN areas. You can contact us today at (507) 202-8942 or utilize our online “Schedule Now” feature to set up an appointment.

Can Radon Gas Be an Issue in a Slab-On-Grade Home?

A common misconception is that you don’t have radon gas or need to do radon testing in slab-on-grade homes. After all, it doesn’t have a basement, right? How could there possibly be radon gas entering your home?

 Building-induced suction (courtesy: internachi.org)

 One of the forces that drives radon gas into your home is what is called building-induced suction. Your home sucks, literally! Bathroom and kitchen exhaust vents, furnaces, water heaters, and clothes dryers all pull air from your home. In addition, weather, wind, and external temperature can affect the pressure in your home. Basically, your home acts like a chimney. Warm air in your home rises and leaks out of the building envelope. Soil gases and radon gases can be drawn into your home through the foundation, whether it is a slab on grade, a crawl space, or a full basement. That concrete slab is porous, may have cracks, and there are openings for plumbing, electrical, and other utilities.

 The fact is that a home built on a slab puts you and your family closer to the source of radon gas. It’s like living in your basement. Radon gas enters your home where your slab comes into contact with the soil. Radon gas doesn’t care one bit if your home’s slab is at grade or 8 feet below grade.

 Radon gas is not only found in basements.

Radon gas is colorless, odorless, and tasteless. Radon gas is naturally occurring as a byproduct of the breakdown of radium in the soils around and under your home. According to the US EPA, radon gas is the second-leading cause of lung cancer, right behind smoking.

 Radon levels can be higher in homes with a basement because, in addition to the slab, you also have soil contact with the basement walls. The closer your living area is to the soil, the higher the potential for exposure to higher levels of radon gas.

 For example, if you live in a home built on a full basement but spend most of your time living on the main floor and maybe sleeping upstairs, your exposure to radon gas is lower. Radon gas continues to break down after entering your home. It is also diluted and dissipates as it moves upward to the upper levels. If you live in a slab-on-grade home, you do not have that buffer, and that radon gas is entering right into your living space.

 All homes have the potential for radon gas.

In Olmsted County and surrounding areas in Minnesota, 50% of the homes have elevated levels of radon gas. All homes are prone to radon gas, and no single home design or style is inherently better than another.

 In 2009, codes required that all new homes be built radon-resistant. At a minimum, passive radon gas mitigation systems are in place. Simply put, this passive radon mitigation system, or radon gas-resistant system, will capture radon gas and route it safely from under your home to the atmosphere. Having a passive radon gas mitigation system in a home does not ensure that radon gas levels are not elevated. Even on a slab-on-grade home, the radon gas in the soil can be greater than what a passive radon gas mitigation system can remove from beneath the slab.

 Testing is the only way to know your radon gas level.

Just because your home has a passive radon mitigation system does not mean you should not test or that radon gas levels are low in your slab-on-grade home.

 For example, I built a slab-on-grade home in 2017. This home was built to be radon-resistant and had a passive radon mitigation system installed at construction. Over the course of a year, I tested the radon levels in the home in the spring, summer, fall, and winter. The radon gas levels in the home averaged anywhere from 3.2 p/Ci/l to 4.1 pCi/L (picocuries per liter), with winter having the highest radon gas levels and summer the lowest. We added a fan to the passive radon mitigation system to make it an active radon mitigation system. After installation, the winter radon gas average in the home was 0.8 pCi/L.

 The action level for radon gas is 4.0 pCi/l or greater. This means that the EPA recommends the installation of a radon gas mitigation system to reduce radon gas levels in your home. It is not possible to reduce radon gas completely. For reference, the average radon gas level in the outside environment is 0.4 pCi/L.

 Testing for radon gas with an electronic continuous radon monitor

 Summary

Radon gas can enter your home regardless of the construction type, and measures should be taken to make your home radon gas resistant. The only way to know for sure is to test your home for radon gas levels. Radon gas testing can be added to any home inspection or performed as a stand-alone service.

 At HomePro Inspections, our home inspectors are trained to inspect all areas of the home. Having a properly installed and maintained radon gas mitigation system will protect you and your family from unnecessary exposure to high radon gas levels. Any issues found are documented in your home inspection report and recommended for resolution by a qualified professional.

 Visit our website to learn more or to schedule your home inspection in the Rochester, Owatonna, and Faribault, MN areas. You can contact us today at (507) 202-8942 or utilize our online “Schedule Now” feature to set up an appointment.

Spring Home Maintenance Checklist

Spring weather seems like it’s just around the corner—if it hasn’t arrived already. Take advantage of the moderate temperatures to get a head start on what should be an annual spring home maintenance routine and the benefits it can provide. Most of these items are fairly straight-forward and relatively easy to perform. If you are unsure or need additional guidance, you can find a video for most anything online. Make sure to watch a few videos to find what works best for you.

Your home inspector may have addressed some of these home maintenance items and listed them on your home inspection report. Use the list below to guide you, and remember that consistent home maintenance will protect your home for years to come.

 Exterior

Roof

·         Inspect the roof (with binoculars) for damage, lifted or missing shingles, and damaged flashing.

·         Check the gutters and downspouts for debris.

 Chimney

·         Check for any loose bricks or flashing.      

·         Have any wood-burning appliances professionally inspected and cleaned.

 Exterior Walls

·         Check the walls for damage and loose materials.

·         Caulk or repair cracks and openings.

·         Repair and paint any loose paint, exposed wood, or trim.

·         Check all hose faucets for operation.

·         Inspect and remove lint and debris from all external vents and air intakes.

·         Check and replace any exterior lighting.

 Deck

·         Inspect and repair any deteriorated wood, displaced or loose boards, supports, or railings.

·         Inspect for any “springiness” in the structure.

 Foundation

·         Inspect for and repair any cracks or openings.

·         Ensure that the soil slopes away from the foundation.

·         Ensure that downspout discharge chutes are installed and directed away from the foundation.

 Interior

Windows

·         Check for cracked panes and loose or missing caulk.

·         Clean the windows, tracks, and frames of any dirt or debris.

·         Check all windows for proper operation and adjust as necessary.

 Kitchen

·         Clean refrigerator door gaskets and seals, and lubricate hinges. 

·         Vacuum the refrigerator and freezer condenser coils.

·         Check and repair appliance lights.

·         Inspect or replace the fire extinguisher.

 Plumbing

·         Check for leaks under kitchen, bathroom, and laundry sinks.

·         Check the water hoses on the washing machine for cracks, bulges, and leaks.

·         Check the water heater for leaks or corrosion.

 Interior

·         Repair nail pops, gouges, and cracks on your walls and ceilings.

·         Touch up paint chips and scratches on your walls, ceilings, and cabinets.

·         Inspect the basement perimeter walls for any signs of moisture.

·         Inspect and test your smoke and carbon monoxide detectors, and replace the batteries as necessary.

 Summary

 Keeping your home in tip-top shape doesn’t take a lot of time and money if you stay on top of your home maintenance items. This list is not all-inclusive, so if you see something that is not right, make sure to address it sooner rather than later. Your pride of ownership will show, and you will feel good knowing that your biggest investment is being properly taken care of.

 At HomePro Inspections, our home inspectors are trained to look for and report any potential home maintenance issues they may come across. Any issues are documented in your home inspection report and recommended for resolution by a qualified professional.

 Visit our website to learn more or to schedule your home inspection in the Rochester, Owatonna, and Faribault, MN areas. You can contact us today at (507) 202-8942 or utilize our online “Schedule Now” feature to set up an appointment.

Do I Really Need Gutters and Downspouts on My Home?

Although gutters and downspouts are a seemingly simple system, they have a pretty important job in protecting your home.

 Gutters and downspouts are on your home for a reason. Their job is to manage the water that runs off of your home’s roof. Proper attention and maintenance will go a long way toward protecting the structural integrity of your home’s foundation, not to mention keeping your basement dry.

 Gutter system clogged with leaves

How much water can flow off of a roof?

Have you ever watched the water run off the edge of your roof? It may not look like much when spread over the perimeter of your home. One of the “factoids” our home inspectors share with our clients is that 1 inch of rain on 1,000 square feet of surface area is nearly 625 gallons of water. Let’s just say you have 1,500 square feet of roof and we have a 2-inch rainfall; that’s a whopping 1,875 gallons of water dumping next to your foundation!

 Without gutters, the water running off of your roof pounds directly onto and erodes the soil next to your foundation. Dumping all of that water next to your foundation increases the risk of a wet or damp basement. In addition, saturated soils will expand more as the ground freezes in the winter, which can cause heaving or displacement of your foundation.

 The gutters and downspouts on your home are there to safely manage and control the runoff away from your home. Proper water management protects your home and yard by controlling the flow of water and preventing pooling and erosion next to your foundation.

 Clogged gutters full of water

 Gutters and downspouts need periodic maintenance.

Like most home systems, your gutters and downspouts need periodic maintenance. Clogged gutters and downspouts are as bad as not having them in the first place. Our home inspectors frequently call out maintenance issues with the gutters and downspouts. We see gutters full of leaves and sticks, which clog the system and allow water to flow over the edge. Water also weighs about 8 pounds per gallon, so if your gutters are full of water, you risk damage to your system due to the weight. It’s also important that the discharge chutes at the bottom of your downspouts are directing the water away from your foundation. Our home inspectors frequently find discharge chutes that are crushed or disconnected.

 Water pooling next to the foundation due to a missing discharge section

 Your gutters and downspouts should be cleaned at least twice a year. The best times are in the spring and then in the fall, after the trees have shed their leaves. Gutters that are full of debris in the winter can result in ice buildup and ice dams forming at the edge of your roof.

 Clogged and frozen gutters detached from the edge of the roof

 If you have the skills and can do it safely, you can maintain your gutters and downspouts yourself. You can also hire a professional gutter cleaning company to do it. The third option is to have a system installed that will prevent debris from entering and clogging your gutters and downspouts. These can either be installed on an existing system or purchased as a complete system. Click here to see a comparison of gutter guard systems.

 Summary

Your gutters and downspouts are an important part of your home. Keeping them maintained and properly functioning will manage water and protect your foundation and landscaping.

 When performing a home inspection, one of the items we look at are the gutters and downspouts on the home. Taking note of the condition of the gutter and downspout system will give your home inspector clues as to water management and whether or not there may be issues with moisture in the basement.

 At HomePro Inspections, our home inspectors are trained to inspect all areas of the home. Having properly installed and maintained gutters and downspouts will help to protect your home from excessive water at your foundation. Any issues found are documented in your home inspection report and recommended for resolution by a qualified professional.

 Visit our website to learn more or to schedule your home inspection in the Rochester, Owatonna, and Faribault, MN areas. You can contact us today at (507) 202-8942 or utilize our online “Schedule Now” feature to set up an appointment.

Cleaning Your Refrigerator Condenser Coils in 5 Easy Steps

Your refrigerator is one of the hardest-working and most expensive appliances in your kitchen, so it’s only natural that you’d want it to run at peak performance and last as long as possible. Keeping your refrigerator condenser coils clean is a great way to meet both of these goals, and this simple task only takes about 10 to 15 minutes.

 Dirty refrigerator condenser coils at the base of a refrigerator

 The condenser coils are typically located on the back of or underneath a refrigerator. These coils are exposed to allow for air flow and heat dissipation. Over time, these coils can become clogged with dust and debris. Dirty refrigerator coils make your refrigerator work harder to stay cold, resulting in higher electric costs and reducing its lifespan.

Dirty refrigerator condenser coils on the back of a refrigerator

The good news is that cleaning your refrigerator’s condenser coils is a relatively simple DIY project. Your refrigerator coils should be cleaned at least once a year, or every six months if you have any furry pets in the home.

 Tools needed:

·         Flashlight

·         Dust mask

·         Condenser coil brush

·         Vacuum cleaner

 5 easy steps:

 1.    Unplug the power cord from the electrical outlet. Depending on the location of the outlet, you may have to pull your refrigerator away from the wall. Keep your refrigerator doors closed to help keep its contents cold.

 2.    Locate the condenser coils. They are generally located either on the back side or under your refrigerator. If they are under, you will have to remove the toe grill.

 3.    Put on your dust mask to prevent inhaling any airborne dust you may stir up. Using your flashlight, inspect the condenser coils. Vacuum as much as you can with a narrow vacuum attachment.

 4.    Using a coil brush, work through the coils to loosen debris and dust. Hold the vacuum attachment close to the brush to keep dust to a minimum. The brush should be able to get to most of the coils. These brushes are usually bendable, and you may need to bend the tip to get at any hard-to-reach places.

 5.    Take a minute to inspect your work and vacuum up any lingering dust bunnies. Wipe down the toe grill and snap it back in place. Plug your refrigerator back into the wall outlet and roll it back in place.

Dirty toe grill at the front of the refrigerator

Keeping your refrigerator running at peak performance is as simple as performing a 15-minute cleaning once or twice a year. When you finish, grab a cold beverage for a job well done. Your refrigerator will use less energy and last longer. Pretty cool, huh? (See how I did that?)

 Summary

At HomePro Inspections, our home inspectors are trained to look for and report any potential issues they may come across. Any issues are documented in your home inspection report and recommended for resolution by a qualified professional.

Visit our website to learn more or to schedule your home inspection in the Rochester, Owatonna, and Faribault, MN areas. You can contact us today at (507) 202-8942 or utilize our online “Schedule Now” feature to set up an appointment.

Cleaning Your Air Conditioner Condensate Drain with Vinegar

One of the top reasons homeowners call for service on their air conditioning system is because of a clogged and overflowing condensate drain line. Most people don’t know that you can avoid this issue with some regular DIY maintenance on your air conditioner system. Usually, you can remove the clog and avoid overflows yourself. Below are some steps to help keep your air conditioner’s condensate line clear and avoid overflows.

 Air conditioner evaporator coil and condensate tray.

The blue plug is where the condensate drain is attached.

 What is a condensate drain line?

First, a little background is needed to help you better understand what an air conditioner condensate drain is. Inside the air handler, there is an evaporator coil that air passes through when your air conditioner is running. As the air passes through the coil, moisture will condense on the coils and drip into a tray. The condensate drain on this tray allows the water to run into the condensate drain line, which then, by gravity, channels the water, usually to a floor drain.

 Condensate drain line with capped access point.

 How do I know if my air conditioning condensate drain line is clogged?

The condensate tray and condensate drain line are both damp places when the AC is running. Water, when combined with dust and lint, can result in a sludge that builds up throughout the drain line over time. This sludge provides a great place for mold, mildew, algae, fungus, and bacteria to grow. Once there is a buildup, you have the potential for a blockage that will cause the water to back up and overflow the condensate tray. One indication that the condensate drain line is clogged is if you see water pooling around the bottom of the furnace.

 How do I prevent the condensate drain line from clogging?

Regular, routine cleaning can help keep the air conditioner drain line from clogging. By repeating the steps listed below, you can kill any mold, mildew, algae, moss, and bacteria.

 Our home inspectors will gladly discuss the air conditioning system with you if you are present during your home inspection. We will show you the condensate drain line and talk about maintenance and cleaning. Just like changing furnace filters and such, you should make cleaning your air conditioning drain line a part of your monthly maintenance schedule. Unfortunately, as is often the case, out of sight, out of mind.

 Adding distilled white vinegar or water to the condensate drain line using a funnel.

 Note: The white cylinder with the black wires in the picture above is an audible overflow alarm sensor at the condensate tray.

 Step-by-step guide

·        Turn your air conditioner off - Switch your thermostat and circuit breaker to the off position.

·        Locate your air conditioner drain line - The condensate drain line is usually a PVC pipe running vertically down the side of your furnace and over to a floor drain.

·        Find your drain access point - Most condensate drain lines have an opening at the top. If your condensate drain line has a cap, remove it. Check to see if there are any blockages.

·        Flush with distilled white vinegar – Pour 1/2 cup of distilled white vinegar down the condensate drain line at the access point. Distilled white vinegar increases acidity and aids in cleaning.

·        Wait 30 minutes, then flush with hot tap water – Flush the condensate drain line with a quart of hot tap water to ensure that everything drains and flows freely.

·        Repeat once a month – By avoiding clogs and buildup, your condensate drain line will work properly.

·        Turn your air conditioner on - Switch your thermostat and circuit breaker to the on position.

 Summary

Taking some time for preventative maintenance on your home and air conditioning system will keep it running and performing to meet your needs. Service calls to unclog an air conditioner condensate drain line are costly and avoidable. Potential damage from water overflowing into your home because of a clog can be eliminated by taking a few steps every month.

 At HomePro Inspections, our home inspectors are trained to inspect your HVAC system and its components. Any issues are documented in your home inspection report and recommended for resolution by a qualified professional.

 Visit our website to learn more or to schedule your home inspection in the Rochester, Owatonna, and Faribault, MN areas. You can contact us today at (507) 202-8942 or utilize our online “Schedule Now” feature to set up an appointment.

Roofing Red Flags Found During Home Inspections

One of the most important considerations when purchasing a new home is the condition of the roof. The roof is a major part of the exterior envelope that protects your home from the weather and outdoor environment.

 A home inspector observing the roof from the eaves

 When performing a home inspection, our home inspectors do their best to assess the condition of the roof. Our home inspection Standards of Practice (SOP) states that the home inspector shall inspect from the ground or eaves. That’s right: ground or eaves. We are not required to walk the roof. Your home inspector may decide to walk the roof, but only if it is safe to do so. We want to have the best look at the roof, but sometimes ice, rain, snow, high winds, height, and roof pitch keep us off the roof.

 The cost of a roof replacement can be high, but the investment in a solid roof is well worth protecting your home. Roof leaks or a roof that is at or beyond its serviceable life may have leaks that can lead to water damage such as rot and mold.

 The following is a general list of red flags that your home inspector will look for when performing a roof inspection. Any issues will be documented in your home inspection report.

 Record of roof replacement

If there is a copy of the property disclosures available, your home inspector will review the document to see if there is a date listed when the roof was replaced. If not, we make our best attempt to determine an approximate age. Roofs over 20 years old should be monitored closely and replaced if they are nearing the end of their life span.

 Excessive moss and tree branches

On areas of your roof where the “sun doesn’t shine,” there is potential for moss growth. Moss can damage your roof and result in failure if it undermines the surface. Excessive moss should be professionally removed or treated to keep it from damaging your roof.

 Moss on a roofing surface

Tree branches should never come into contact with your roof surface. The wind will cause the branches to rub on the roof and wear away the granules on the shingles, causing premature failure of the roof surface.

 Missing or curling shingles

As shingles age, they can start to become brittle. The aggregate surface starts to deteriorate, and the substrate of the shingles is more exposed to sunlight. This can cause the edges to curl up, making your roof susceptible to wind damage. High winds can either snap off a shingle tab or whole sections of your roof.

 An extreme case of curled and patched shingles

 Previous roof repairs

If your home inspector sees prior patching or shingles that are replaced on a roof, this could mean that there were issues with installation, high winds, or aging of the roof surface.

 Moisture damage in the attic

A leak in a roofing system may lead to rot and deterioration to the structure or framing of your roofing system as well as the roof decking. These types of leaks may never get bad enough to present themselves on the ceiling, but they can lead to some major damage if undetected.

 Dark spots or paint patching

Moisture stains and areas on the ceiling that look like they’ve been painted over can be signs of past or present leaking. These types of leaks can indicate potential problems with water damage or mold in the materials on the other side of that paint.

 Summary

A solid roof is important to protect your home from the elements. Whether part of a home inspection or not, homeowners should take the time to look at their roofs at least seasonally. If any of these red flags present themselves, resolve them immediately.

 At HomePro Inspections, our home inspectors are trained to inspect the roofing system of your home. Any issues are documented in your home inspection report and recommended for resolution by a qualified professional.

 Visit our website to learn more or to schedule your home inspection in the Rochester, Owatonna, and Faribault, MN areas. You can contact us today at (507) 202-8942 or utilize our online “Schedule Now” feature to set up an appointment.

Reducing Smells (Odors?) in Your Washing Machine

We all love it—that warm, fresh smell of laundry right out of the washing machine. We think that because our washing machines are for cleaning, they should be clean, right?

 Just like most appliances and machines around your home, your washing machine needs to be inspected and maintained regularly. If your washing machine is not properly maintained and cared for, it can result in some bad odors, and nobody wants that. There are a variety of reasons why your washing machine may become a bit smelly, and to keep those foul odors under control, there are some steps you can take to keep it well-maintained and odor-free.

 Does your washing machine smell?

Keep your drum, seals, and door clean

Lint builds up, and a dirty drum can play a big part in why your washing machine has that funky smell. Even though it is a “washing machine,” it can still accumulate laundry soap residue, dirt, and lint. Over time, moisture, along with built-up residues, can lead to mildew, mold, and a musty smell if your washing machine isn’t properly maintained and kept clean.

 Cleaning the inside surfaces of the drum, seals, and door regularly with vinegar or an all-purpose cleaner is recommended. Vinegar is an all-natural cleaner that is inexpensive, does a great job of eliminating odors, and won’t damage any of your washing machine’s internal components.

 Built-up lint can also lead to odors in your washing machine, so make sure to clean out the lint filters after every load. If you make this a habit, you can reduce odors and eliminate another source of potential smells.

 Although using bleach in white loads can help to kill bacteria, eliminate mildew, and remove some mold strains, it usually only affects the internal drum and not the seals or other areas such as the seals in the door.

Cleaning the washing machine seal

 Remove wet clothing

Leaving wet clothes to sit after the wash cycle or throwing wet towels and such in the washing machine to be washed later can also create an environment for mold and mildew to grow. Mold likes dark, moist environments. Leaving clothes in the washing machine can provide an ideal environment for mold to grow and spread.

 Don’t overload your washing machine

You naturally want to get the most out of every load of laundry. Overloading your washing machine makes it difficult for water and detergent to circulate efficiently. Just because the drum has extra room doesn’t mean you should fill it.

 Refer to your owner’s manual to determine the proper load size for your washing machine. By properly loading your washing machine, everything will be cleaned and rinsed of any soap residue and dirt. By being a bit more moderate with your loads, you can reduce buildup and keep bad odors at bay.

 Residue and water build up at a door seal

 Cleaning products

Determining the correct amount of soap or other cleaning products will vary with the material, color, size, and weight of every load. Too much soap can result in residue buildup in your washing machine. Not enough soap, and your clothes may not feel and smell clean. Read your cleaning product labels for recommended amounts based on load size.

 Summary

Sticking to a regular schedule for cleaning and maintenance will help get rid of the sources of bad odors. Taking care of the machine that takes care of your clothing will be well worth it in the long run.

 At HomePro Inspections, our home inspectors are trained to inspect all areas of the home. Although inspection of washing machines is outside the scope of a home inspection, our home inspectors will note any bad smells during the course of your home inspection. Any issues found are documented in your home inspection report and recommended for resolution by a qualified professional.

 Visit our website to learn more or to schedule your home inspection in the Rochester, Owatonna, and Faribault, MN areas. You can contact us today at (507) 202-8942 or utilize our online “Schedule Now” feature to set up an appointment.

Don’t Ignore Water Leaks in Your Home

It’s pretty typical for a homeowner, even a home inspector, to let procrastination take over sometimes. Even something small like a water leak can go on for a while before it gets fixed.

 Water leaks are one of those things that seem like they are not such a big deal but can add up to some unexpected costs if they are not resolved in a timely manner. These things typically don’t heal themselves, so you just have to fix them before they end up costing you money.

Water leaking from a faucet

 Potential areas for leaks

Think of all the places in your home where water leaks can happen. Kitchen, laundry room, bathrooms, and appliances like water heaters, water softeners, and refrigerators that dispense water and ice cubes. All of these areas and appliances have the potential for water leaks. You should make it a practice to occasionally inspect these for leaks or wetness.

 There are a wide variety of reasons for water leaks. Sinks and laundry tubs can develop a broken seal at the drain. Pipe joints can crack or deteriorate due to movement. Clogged or deteriorated drain lines may have leaks in concealed areas. High water pressure may result in leaks in your water lines or fixtures. Regardless of the reason, water leaks should be resolved as soon as they are noticed.

 Periodically check for leaks

Many times, homeowners don’t even know they have a problem until they see the damage caused by a water leak. Years ago, I walked across the family room in the basement and realized that the carpet was wet. After some investigation, I found a small pinhole in the shower faucet within a wall. Luckily, the damage was confined to some wet sheetrock and carpet.

 We advise our home inspection clients to pay attention to and perform routine checks around toilets, showers, faucets, garden hoses, water softeners, and water heaters. Anywhere there is a potential for drips, slow leaks, or hidden leaks should be checked periodically.

 The costs of a water leak

 In areas where there’s a drip at a faucet or a toilet that has a water leak at the tank seal, the cost of wasted water can add up over time.

 It is estimated that nearly 1 trillion gallons of water are wasted every year due to leaks. Your water bill could increase by up to $20 per month because of a dripping faucet. A leaky toilet can add up to another $150 per month. If neglected, these two simple fixes could potentially cost you up to $2,000 a year in wasted water usage.

 These types of leaks are usually relatively easy to fix. A leaking faucet may just need a seal replaced or tightened, and a toilet water leak can most likely be resolved by replacing the flapper valve in the toilet water tank. Fixing leaks like these yourself can save you a lot of money. If you aren’t comfortable doing it yourself, hire a plumber. It will cost more to fix the leak, but over the long haul, it will save you money.

 Potential water leak at the flapper valve

 Organic growth and deterioration

Again, ignoring a water leak can cause major damage to your home, and quite often, that damage is hidden. Even if it seems small or unimportant, over time, a small or recurring leak can cause significant damage.

 Mold can grow in conditions where something is continually wet. These areas can be hidden in walls, under sinks, or in other concealed places. If you detect a musty or moldy scent in your home, don’t ignore it. Molds can cause health issues for some people.

 Deteriorated wood from a water leak

 Mold and wetness can also deteriorate building materials. Our home inspectors often find rotted wood under toilets and bathtubs in older homes. These can be areas that are hard to get to, so they can go unnoticed for years. Water leaks and puddles can also attract insects and rodents, as they provide a water source for them.

 Summary

 Initially, a slow water leak or drip may not seem like much, but over time, it can result in a big expense. Whether it’s increased water usage or damage, it comes right out of your pocket. Take the time to do a periodic inspection of your home to check for any potential water leaks.

 At HomePro Inspections, our home inspectors are trained to inspect all areas of the home. We look for water leaks and potential damage during the course of your home inspection. Any issues found are documented in your home inspection report and recommended for resolution by a qualified professional.

 Visit our website to learn more or to schedule your home inspection in the Rochester, Owatonna, and Faribault, MN areas. You can contact us today at (507) 202-8942 or utilize our online “Schedule Now” feature to set up an appointment.

Should I Attend My Home Inspection?

When scheduling a home inspection, our client care representatives are frequently asked, “Should I attend my home inspection?”

 At HomePro Inspections, our answer is always “yes!” We always recommend to our clients and realtors that they attend their home inspection. We want our clients to engage with their home inspector, see what the inspector is inspecting, and learn about the condition of their new home.

 Your biggest investment

Buying a new home is a big investment, and for most people, it is likely the largest investment they’ll make in their lives. Regardless of the market, you should always insist on a home inspection, and you should attend the home inspection. It is essential that you know the condition of the home you are investing in.

 The inspection process

The inspectors at HomePro Inspections are certified through the International Association of Certified Home Inspectors® (InterNACHI) and strictly follow their stringent Standards of Practice (SOP). During the home inspection, our home inspectors follow a comprehensive process to check and address all systems and parts of your home, from the foundation to the roof.

 Their job is to provide you with an unbiased opinion of the general condition of your new home. This opinion includes both the good points and any problems that need to be fixed.

Findings of the Home Inspection

 As the home inspector works through your home inspection, they will explain what they are doing and discuss any defects or positive attributes of your new home. This is an opportunity to get firsthand answers to any questions you may have.

 If you cannot be there for the full home inspection, your home inspector will perform a summary walk-through with you, pointing out the highlights and concerns of their findings at the end of the home inspection. If you cannot attend at all, you can request a follow-up call with your home inspector after you have reviewed your report.

 Our findings are documented on our handheld devices throughout the course of the inspection. This allows your home inspector to complete the final report efficiently and get it to you via email, typically within a few hours after the completion of your home inspection. We want you to have the report as soon as possible, while the home inspection is still fresh in your mind.

 Firsthand is always best

Being present for your home inspection allows you to see firsthand any concerns your home inspector may discover. All concerns are documented, and pictures are provided in your home inspection report. Being there for the inspection allows you to interact with your home inspector as well as ask questions to help you better understand your new home.

 We understand that buying a new home is exciting, and clients may want to bring both sets of parents, contractor friends, children, or a trusted family member to the home inspection. We recommend, however, that only the primary homebuyers attend the home inspection. This lets you and the home inspector look at the results and talk about them in a focused way.

 Experience has shown us that the more people there are at a home inspection, the greater the risk of distractions and interruptions. The home inspection process requires the full attention of the home inspector, and the buyer needs to make every effort to understand what the inspector is trying to communicate to them regarding the condition of their new home.

 Learning how to operate your new home

As you proceed through the home inspection, your home inspector will share maintenance guidance with you. In addition, we show you where all of your main shutoffs are. We also tag these valves with their appropriate names to help you find them in the case of an emergency. It is important to know how to shut off water and gas valves as well as where the main electrical disconnect is located in the event of an emergency. Your home inspector will show you where your furnace filter is located, as well as thermostats, garage door controls, and any other unique aspects of your home. Of course, any questions you may have can be answered as you work through the inspection process.

 Summary

Buying a new home can be a stressful yet exciting experience for most people, especially first-time home buyers. Knowing the condition of your new home will help relieve that stress and give you peace of mind. You will have the information you need to know whether you made a wise decision in the purchase of your new home.

 At HomePro Inspections, our home inspectors are trained to inspect and share the information found during your home inspection. Any issues they find are documented in your home inspection report and recommended for resolution by a qualified professional.

 Visit our website to learn more or to schedule your home inspection in the Rochester, Owatonna, and Faribault, MN areas. You can contact us today at (507) 202-8942 or utilize our online “Schedule Now” feature to set up an appointment.


Smoke Alarms – Evolving to Meet Modern Needs

We see this a lot during home inspections: smoke alarms that are removed, disconnected, or disabled in some way. Whether it’s due to that annoying low battery chirping noise, the shrieking “false alarm” caused by the smoke from a burnt pizza, or because the smoke alarm is old, people disable their smoke alarms and then forget about them. That’s a dangerous thing to do. First, even though smoke alarms can be an occasional nuisance, by code, they’re required. Second, the lack of properly functioning smoke alarms is an invitation to potential disaster, putting you and your family at lethal risk in the event of a fire or smoke-related incident.

This fact speaks for itself: in a home where the smoke detectors are broken or not working, your chance of surviving a smoke-related accident is 55% lower than in a home with working smoke alarms installed in the right places.

Research and development continue in the ongoing task of designing smoke alarms that can distinguish between the smoke caused by a cooking source and an actual fire. Underwriters Laboratories (UL), the folks that set consumer safety standards, has recognized these smoke alarm issues. They don’t want to see people disabling their smoke alarms and have been working towards the goal of developing products that can reduce nuisance alarms.

What is the difference between a smoke alarm and a smoke detector?

As with most products these days, choosing the correct smoke alarm for your home can be confusing. Most consumers can become confused by the various types of smoke alarms and their particular terminology. Below are some basic definitions that can help you choose the best product for your home.

• A smoke detector employs a sensor that can monitor for and detect smoke. These smoke detectors are usually connected to a fire alarm system that protects a whole building through a central control system. Smoke detectors are typically found in commercial applications such as schools and larger commercial buildings.

• A smoke alarm also employs a sensor that can monitor for and detect smoke. In addition, it has a built-in speaker that alerts occupants with an audible alarm when it senses smoke. Smoke alarms are what we typically see in our homes. As usual, there is more than one option for smoke alarms in newer homes, including:

o Single-Station: A single-station smoke alarm is a stand-alone device, either battery-operated or hard-wired into the home’s electrical system. It will sound an alarm if smoke is detected.

o Multiple-Station: A multiple-station smoke alarm employs two or more smoke alarms hard-wired into the home’s electrical system. All alarms in this system will sound if smoke is detected at one of the devices. There are also multiple station systems that are interconnected and communicate wirelessly.

Future standards for smoke alarms

The original standards for smoke alarms were put in place back in the mid-1970s. These standards were periodically updated to better protect people as a result of the newer products and materials being used to build furniture and other things commonly found in homes.

For example, back in the day, most products in your home were made of wood, cotton, wool, and other natural fibers. Today, polyurethane and other synthetic products are used in various forms, such as foam padding and in furniture, flooring, and appliances. These synthetic materials burn faster and hotter than the older materials. The smoke from these polyurethane materials is also different from that created by wood, cotton, wool, and other natural fibers.

The newest standards went into effect during the second half of 2022. Smoke alarms produced under these new standards will have specific labeling stating that they “Help Reduce Cooking Nuisance Alarms.” They must also be able to effectively sense the smoke produced when polyurethane is burning.

Regular smoke alarm maintenance

• Refer to and follow the manufacturer’s maintenance recommendations.

• Check your smoke alarms every month by pressing the test button.

• Replace the batteries per the manufacturer’s recommendations, typically annually.

• Replace your smoke alarms at least every 10 years.

Replacing a battery in a smoke alarm

Note that some of the newer smoke alarms are constructed with a built-in, long-life battery that cannot be replaced. The entire unit must be replaced when it starts to chirp, indicating that it is nearing the end of its useful life. Make sure that if you remove an older smoke alarm, it gets replaced in a timely manner.

Smoke alarm placement

It’s important to have smoke alarms in the proper locations throughout your home. Smoke alarms should be in every bedroom as well as the adjacent area. A minimum of one smoke alarm should be on every level of your home. Check out the Minnesota State Requirements if you have any questions.

Summary

Although the new standards will make us safer in the future, now is a good time to check the smoke alarms currently in your home. Take time every month to test and inspect your smoke alarms. If a smoke alarm is chirping, replace the battery as soon as possible. Upgrading to newer smoke alarms can effectively protect you and your family and reduce nuisance alarms.

At HomePro Inspections, our home inspectors are trained to look for and report any potential issues they may come across. Any issues, such as missing or old smoke alarms, are documented in your home inspection report and recommended for resolution by a qualified professional.

Visit our website to learn more or to schedule your home inspection in the Rochester, Owatonna, and Faribault, MN areas. You can contact us today at (507) 202-8942 or utilize our online Schedule Now feature to set up an appointment.

I Have Black Mold in My House…Now What?

"I have black mold in my house!” We often hear this from people when they call and ask if we do mold testing. The fact is, there are many molds that appear black. Mildew can also look black. Molds come in a variety of colors and sometimes change color as they go through their life cycle. Since "black mold" (Stachybotrys chartarum) gets all the attention, that seems to be where we start. As for whether or not it's mold, especially black mold, at HomePro Inspections, we like to say "organic growth" until we have taken samples, tested them, and know what it really is.

 “Organic Growth” from a leak under a sink

Where do we start?

Typically, when a client calls and wants mold testing, we start with a few questions. Do you physically see what you think is mold? Is the area wet? Is there a moldy smell in the area? Has there been leaking? Are occupants exhibiting allergy symptoms, headaches, etc. when in the home that go away when they are out of the home?

 Sometimes people call and want mold testing because someone who will be living in the home has severe allergies to molds or a compromised immune system. They just want the mold testing to make sure that there are no issues that will affect their known conditions.

 Mold does not affect everyone equally.

People will react to molds differently. Some people have no symptoms when exposed to mold, and some people react quite quickly.

 Several years ago, I was training a new home inspector. We entered a home that was unoccupied and had been empty for an extended period. We started the inspection process, and after about 5 minutes, the guy started sneezing, got a runny nose, and had scratchy eyes. I asked him if he was okay, and he said, “There’s mold in this house.” We headed downstairs. It smelled moldy in the basement, and we found wetness on the walls and carpeting. The walls had what appeared to be mold growing in the wet areas.

 What affected the other inspector did not affect me at all. Some people are more sensitive to things like mold than others. As with my inspector, people can have all or some of the symptoms, like a stuffy and/or runny nose, sneezing, trouble breathing, and watery, itchy eyes. Some people may develop a rash and itchy skin. Others may have headaches. People with asthma may have a more intense reaction to mold.

 Mold in the work environment

I had been hired to do mold testing in an older building that had office suites in it. The tenants complained that when they come to the office on Monday mornings, it smells a bit musty. Anywhere between a few hours and a day, several of the people working in the office started to have all or some of the symptoms listed above. In my interviews, people told me they typically felt fine before they came to the office.

 We did air testing and swab sampling of the affected areas and sent them off to the lab for analysis. During our inspection, we found some leaks in the HVAC system, surface mold in the ducting, and a large area where the carpeting was constantly damp.

The carpet tack strips on the basement floor are wet and deteriorated 

Outdoor molds

Repeated exposure to molds in the outdoor environment can also affect some people and produce allergic symptoms. For myself, I lived in the woods for about 26 years. During the last 4 to 5 years, I developed allergic reactions to the molds produced in the spring and fall. The molds that break down the leaves and other organic matter on the forest floor started to affect me after years of exposure.

 People who live in rural agricultural areas may have issues when the farmers are picking crops because of the airborne mold in the dust of the harvested leaves and grains.

An extreme example of mold on field corn 

Summary

There is no hard set of rules for how mold affects us. Like with most things in life, we are all different. Some people have little to no issues with mold, but with repeated exposures, they may develop minor to severe symptoms. Others with immune deficiencies or other respiratory sensitivities may have severe reactions to mold.

 Keep in mind that what is shared here is general in nature and based on my experiences as to the effects mold may have on an individual. If you are having symptoms and think they are being caused by mold, you should seek medical advice from your doctor.

 At HomePro Inspections, although mold testing is not part of a home inspection, our home inspectors are trained to look for and report any potential issues they may come across. Any issues are documented in your home inspection report and recommended for resolution by a qualified professional.

 Visit our website to learn more or to schedule your home inspection in the Rochester, Owatonna, and Faribault, MN areas. You can contact us today at (507) 202-8942 or utilize our online “Schedule Now” feature to set up an appointment.


Mold and Dampness Basics

Is it common to have mold in buildings?

The answer is yes; mold is very common in homes and buildings. If you have areas of your home that are high in moisture, you have the potential for mold. Leaks around windows, doors, plumbing, or roofs, and wet basements or flooding are areas with potential for mold. If consistently wet, mold will grow on wood, sheetrock, insulation, ceiling tiles, carpeting, and many other materials in your home. Given the right conditions, mold can grow on most any surface.

 What kinds of mold can grow in my home?

Cladosporium, Penicillium, and Aspergillus are some of the more common kinds of molds found in homes and buildings. There are others, but these are the ones that seem to be everywhere. And they are happy to quickly grow when and where the conditions are right.

 Penicillium mold spores

How does mold get into and grow in my home?

Molds are everywhere in our environment, indoors and outdoors, and play an important role in nature. For example, in nature, molds breakdown and decompose leaves and other organic materials to help nourish our soils.

 Open windows and doors are the most typical entry points for mold into a home. Mold spores can also be tracked into your home on your shoes and clothing. Pets can also bring mold into your home. When mold spores find themselves in areas of high moisture and the right temperature, they will grow. There are a multitude of areas in your home where building materials and the right amount of moisture provide suitable nutrients to encourage mold growth. Molds are very adaptable and can grow at varying levels of moisture, temperatures, and materials.

 What types of materials do molds grow on?

Materials that contain cellulose, like wood, ceiling tiles, paper products, and cardboard, provide the nutrients mold loves to grow on. When conditions are right, mold can also grow on a variety of other surfaces and substances, including paints, wallpaper, insulation, gypsum (drywall), carpets, and upholstery. Mold can even grow on dust!

 How does a person know if their house has a mold problem?

The best way to determine if you have a mold problem is through mold testing. Our home inspectors are trained to perform mold testing using a method of gathering and analyzing air samples. Unless visible, the source of a mold problem can sometimes be hard to find. If you have a larger mold issue, infestations can usually be smelled or easily seen, such as in basements or other confined or poorly ventilated areas.

 Moisture staining at the baseboard

 How can I keep mold out of my home?

As a part of your routine home maintenance, look for evidence of moisture or signs of mold. Conduct a thorough assessment of your home, paying close attention to any signs of flooding, infiltration, condensation, or leaks. If you find conditions that are conducive to causing mold, correct them right away.

 Potential mold at a window

 You can help control mold in your home by following the guidelines below:

·         Maintain humidity levels between 30% and 50%.

·         Fix any leaking pipes, roofs, or windows promptly.

·         Thoroughly dry and clean any areas where flooding has occurred.

·         Use exhaust ventilation in bathrooms, kitchens, and laundry areas.

·         Use your air conditioning during hot, humid weather.

 Summary

Mold is everywhere. The key is to perform periodic inspections of your home and to resolve any issues you may come across. Pay attention to musty odors, especially in damp basements and confined spaces. Controlling humidity and keeping these areas of your home dry will go a long way toward keeping mold to a minimum in your home.

 At HomePro Inspections, although mold testing is not part of a home inspection, our home inspectors are trained to look for and report any potential issues they may come across. Any issues are documented in your home inspection report and recommended for resolution by a qualified professional.

 Visit our website to learn more or to schedule your home inspection in the Rochester, Owatonna, and Faribault, MN areas. You can contact us today at (507) 202-8942 or utilize our online “Schedule Now” feature to set up an appointment.


Make a New Year’s Resolution to Take Care of Your Home

It’s the start of a new year, that time when we make resolutions. This year, why not make a resolution to take better care of your home? You don’t have to do all the projects at once; just make a plan and stick to it. Don’t forget, there are resources on the internet that address most anything. Do your research and keep your skill sets in mind as you tackle any project.

Make an assessment or inspection of your home.

If you’ve had a home inspection and were there when it was conducted, you may remember that your home inspector looked at a lot of aspects of your home. If you still have it, refer to your home inspection to get a general idea of what areas to cover. Go through the inspection report sections and make a plan for assessing each area of your home.

 Prioritize your findings based on severity (must do, should do, would be nice to do) or by category, like mechanical or cosmetic. Do whatever works for you. Think about costs and how you may want to or have to budget the projects.

 Set aside an emergency fund for home repairs.

Putting aside money every month can help to take the bite out of any unforeseen costs associated with the maintenance of your home. We usually recommend this during the course of a home inspection.

 Most experts recommend allocating 1% to 3% of your home’s value for maintenance or repairs. First-time homeowners can be overwhelmed by the “startup costs” of owning a new home. Having a maintenance fund can help take some of the stress out of having to pay for unexpected repairs.

 Perform annual heating and cooling maintenance.

It can be easy to ignore your HVAC (heating, ventilation, and air conditioning) systems. After all, they’re just supposed to work, right?

 We recommend annual maintenance of these systems. Maintaining your HVAC system will help it run smoothly and avoid major surprises and expenses. One of the most common HVAC notations our home inspectors make when inspecting HVAC systems is “System does not appear to have been maintained per manufacturer’s recommendation within the last year.” If you have a whole-house air-to-air exchanger, make sure to follow the manufacturer’s instructions for maintenance.

 Some utility companies offer programs that are add-ons to your utility bill and will cover your annual HVAC maintenance. These programs are well worth the money. An example our home inspectors share is that if your 90% efficient furnace is running at 80% efficiency, that’s another 10 cents of every dollar you spend on energy that is going right up the exhaust stack.

 Change your HVAC filters when specified.

Based on the type of filter your system requires, it should be changed based on the manufacturer’s recommendation. Dirty filters will not only compromise your home’s air quality, but they will also rack up increases in your energy costs. Dirty filters restrict air flow and make it harder for your HVAC system to efficiently move air. If the fan has to run longer and harder, that will result in higher energy costs. Whether you change your filter monthly, quarterly, or annually, having them on hand makes the task easy and can help you stay on schedule.

 Keep your dryer vent clean.

Clogged dryer vents make your dryer work harder and reduce efficiency. The frequency of cleaning your dryer vent will vary based on your family size, but it should be cleaned annually. If you notice that the dryer cycle is starting to increase, take the time to clean the dryer vent. Another reason to keep your dryer vent cleaned is to help prevent fire hazards. If you are not up to the task or if your dryer venting is hard to access, have the cleaning done professionally.

 Test and maintain smoke and carbon monoxide detectors.

For your family’s safety, make sure you are checking that your smoke and carbon monoxide detectors are tested with the test buttons per the manufacturer’s recommendation. In addition, make sure they are clean and the batteries are replaced regularly. Smoke and carbon monoxide detectors should also be replaced every 7 to 10 years. Our home inspectors commonly find units that are years past the replacement date.

 Check and clean your rain gutters and downspouts.

Keeping water away from the foundation of your home will help to avoid and reduce damage. If your roof is high and steep, we recommend you hire a professional. Keep in mind that an inch of rain on a surface area of 1000 square feet equates to roughly 630 gallons of water. Clean gutters and properly directed discharges will keep that water away from your home’s foundation.

 Inspect and maintain your door and window seals.

Door and window seals should be inspected and replaced as needed if they are damaged, loose, or worn. Reducing or eliminating leaks will save you money and keep your home more comfortable. Aside from obvious damage, using a smoke stick or lighter flame can help determine if you have a draft or leak that needs to be repaired.

 Clean your kitchen appliances.

Debris, dust, cooking splatters, and dirt can accumulate on, around, and under your kitchen appliances. Take some time to carefully pull out your appliances to clean around and under them. Keeping the cooling coils and compressor area of your refrigerators and freezers dusted and clean will help the appliance run more efficiently. Run your oven through the cleaning cycle, and make sure that any exhaust vent filters are regularly cleaned.

 Inspect your roof.

Inspect your roof regularly, especially after a storm and in the spring after the snow melts. If you are uncomfortable with walking on your roof or you feel it’s too dangerous, you can at the very least view it from the ground or eaves with binoculars. Look for damaged and/or deteriorated shingles, and make sure there are no tree branches or debris lying on or in contact with the roof. Repair, replace, or remove as necessary.

 Inspect and clean your fireplace chimney.

If you have a wood-burning fireplace, it is recommended that the firebox and chimney be inspected and cleaned annually. Depending on the use and system in your home, having it professionally cleaned will help the fireplace operate efficiently and safely. Gas fireplaces should be maintained annually to ensure efficient operation.

 Take care of your trees and shrubs.

Annual trimming and inspection of your trees and shrubs helps to prevent damage to your home. Trees are bare in the late fall and winter, which makes it easier to see any damaged, broken, or sagging branches. Keeping tree and shrub branches away from your siding and shingles keeps them from rubbing against them in the wind and causing damage. It also makes it harder for squirrels, chipmunks, and other animals to get on your roof.

Summary

Keeping your home maintained and running at peak efficiency will save you money and protect your largest asset. You may also gain some new skills and satisfaction from taking on some projects you have never tackled before. The items above are not all-encompassing. If you see something in your home that doesn’t seem right, address it sooner rather than later. Maintenance issues do not fix themselves and do not get better over time.

 At HomePro Inspections, our home inspectors are trained to inspect the areas addressed in this article. Any issues are documented in your home inspection report and recommended for resolution by a qualified professional.

 Visit our website to learn more or to schedule your home inspection in the Rochester, Owatonna, and Faribault, MN areas. You can contact us today at (507) 202-8942 or utilize our online “Schedule Now” feature to set up an appointment.